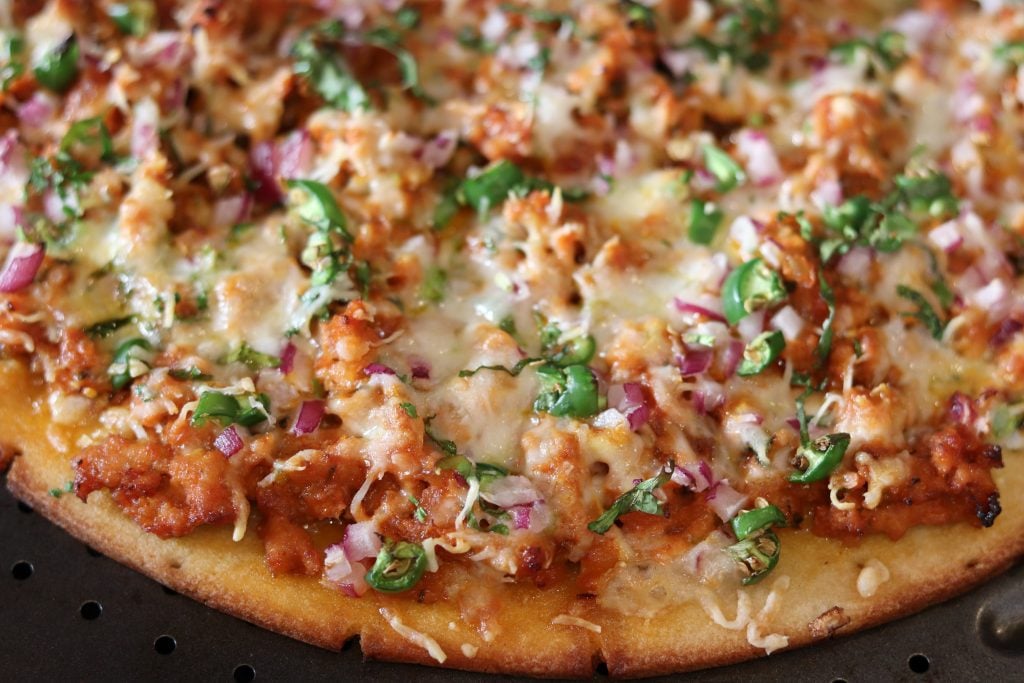
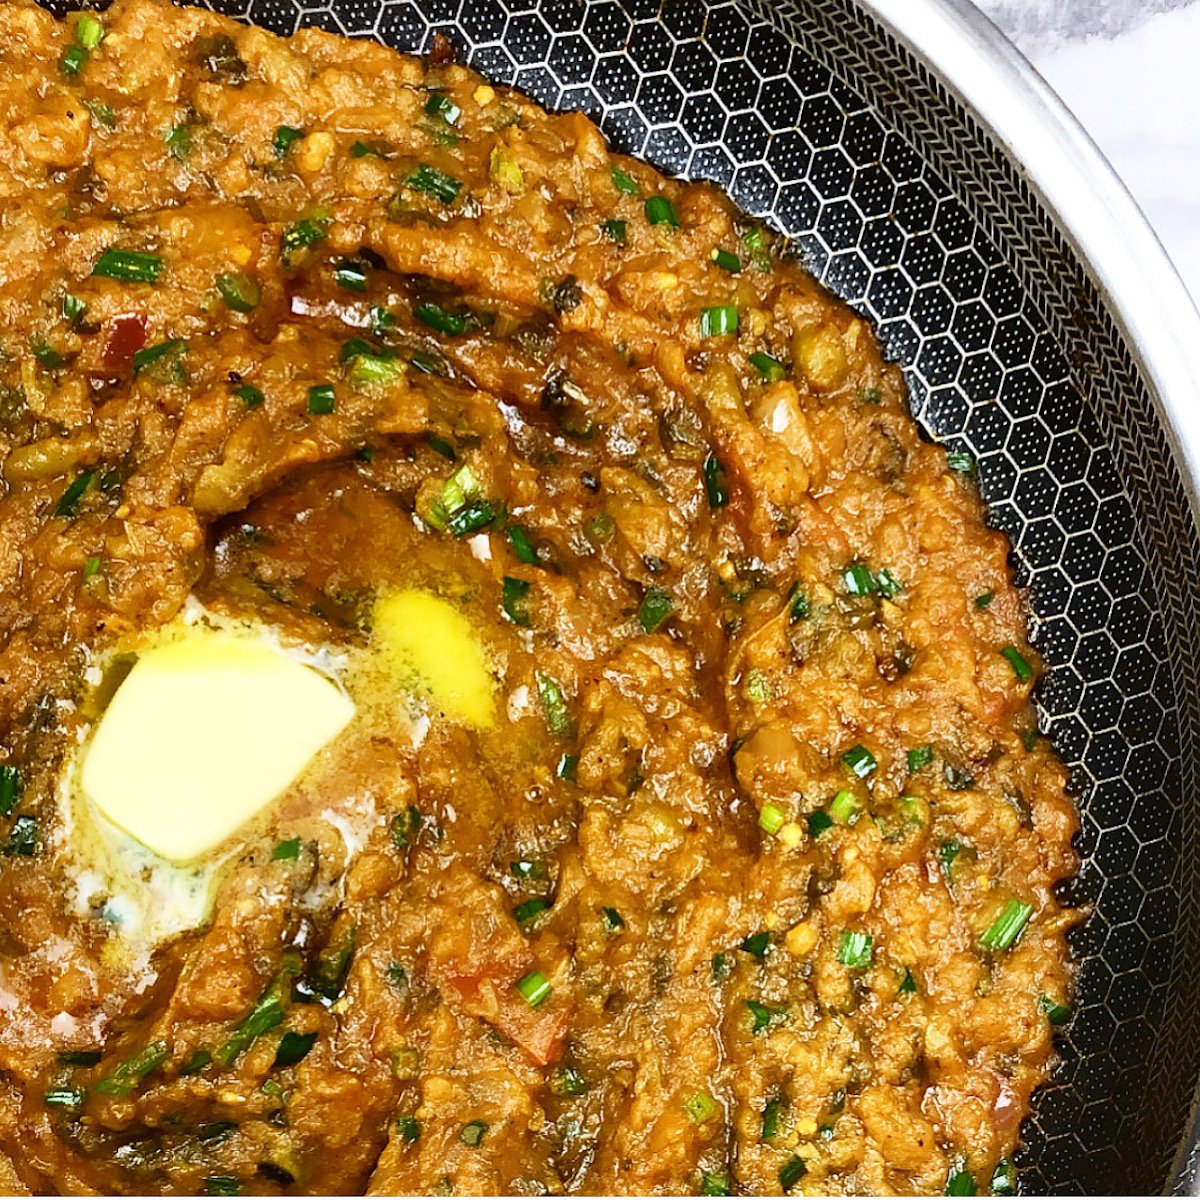
This Indian Spiced Pizza is made with Chicken Kheema and Trader Joe’s Cauliflower Pizza Crust
Keep this one on repeat! desi pizza is deliciously spiced with mozzarella, spices, and vegetables. Paired with a Trader Joe’s Cauliflower Pizza Crust that gives it a crisp outcome.

Add extra spices and serve it as an appetizer or enjoy it for dinner with your favorite drink!
- Why You’ll Love it!
- Ingredients
- Instructions
- Top Tips
- Storage
- Why Pick Trader Joe’s Cauliflower Pizza Crust
- 📖 Recipe
- 📖 Recipe
- 💬 Community
Why You’ll Love it!
This clean Indian meal is making me drool as I type! Since Indian Chicken Kheema Pizza takes minutes to make with meal-prepped chicken kheema and Trader Joe’s Cauliflower Pizza Crust it’s a winner meal!

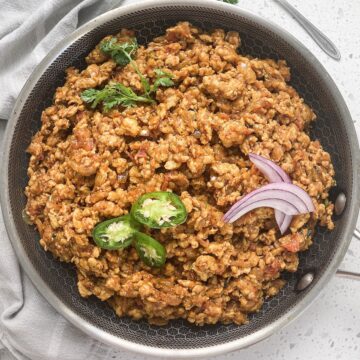
Chicken Kheema
Ingredients
- Kheema (recipe below) - I like to make extra kheema every time so recipes like this can be made throughout the week.
- Fresh chopped cilantro
- Onion, diced
- Chili Peppers , diced
- Shredded Mozarella Cheese
- Pizza crust of choice
Instructions
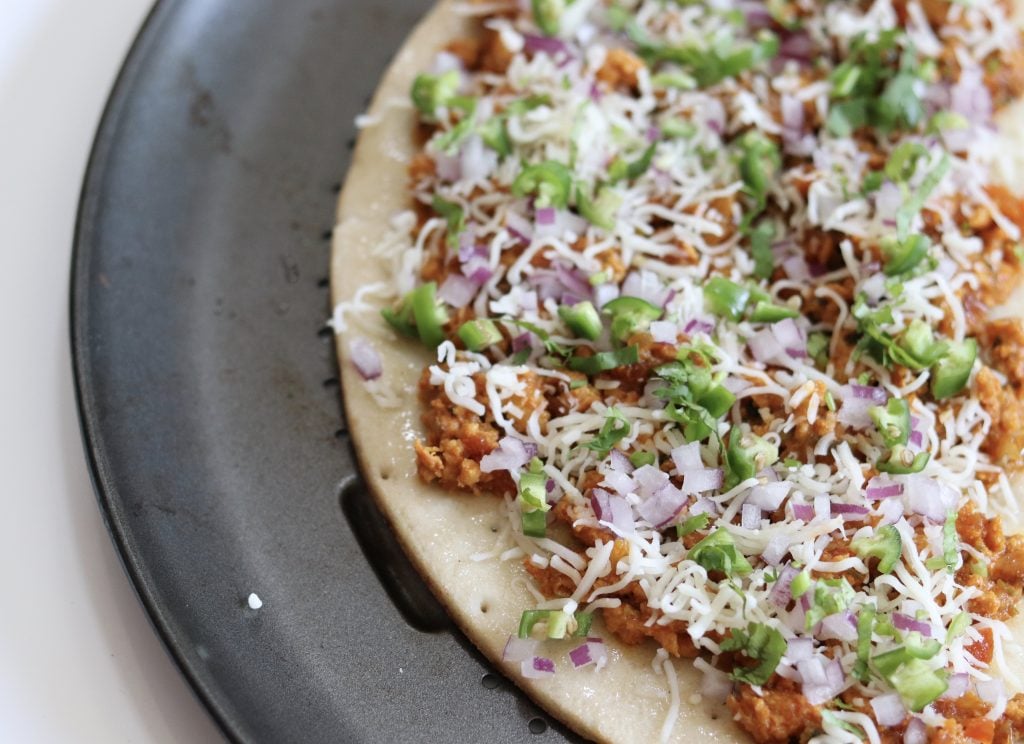
- Prep the pizza crust per packaged instructions. I like to bake the crust before adding the toppings to give it more of a crisp.
- Layer on chicken kheema, shredded mozarella cheese, cilantro, onions, and chili peppers.
- Bake until the cheese is melted and crust is crisp.
- Slice and enjoy!
Top Tips
- Bake the crust until almost crisp, then add the toppings, and finally bake it again until cheese is melted
- Use a thin pizza crust instead of cauliflower crust
- Add cilantro and chili peppers!
Storage
- If using cauliflower crust, this pizza does not store for more than an hour without getting chewy or soggy.
- Party Idea - Use regular pizza crust such as my green pizza crust or 00 Flour.
Why Pick Trader Joe’s Cauliflower Pizza Crust
I buy a cauliflower pizza crust from the freezer section to make life a bit easier. Honestly, I have tried multiple different brands and they all seem to have lived up to my expectations of a crispy crust thus far, but I seem to keep buying the Trader Joe’s version because of convenience.
📖 Recipe

Kheema Pizza
Ingredients1x2x3x
- ▢ 1 large pizza crust (I prefer cauliflower crust)
- ▢ 1.5 cups kheema
- ▢ 1 cup finely shredded mozarella cheese
- ▢ ¼ cup diced onion
- ▢ ¼ cup finely chopped cilantro
- ▢ chopped chili peppers
Instructions
- Prep the pizza crust.
- Layer the chicken kheema onto the crust.
- Spread the mozarella cheese evenly on the pizza
- Top with cilantro, onions, and chili peppers.
- Bake until the cheese is melted and the crust is cooked through.
Nutrition
📖 Recipe
Indian Chicken Kheema Recipe
Ingredients1x2x3x
- ▢ 1 lb ground chicken
- ▢ 1 tablespoon ginger, fresh and grated
- ▢ 1 tablespoon garlic, fresh and minced
- ▢ 1 teaspoon turmeric powder
- ▢ 2 tablespoon coriander powder
- ▢ 1-2 tablespoon garam masala
- ▢ 1 large onion, finely chopped, grated, or food processed
- ▢ 1 large beefsteak tomato, finely chopped
- ▢ 1 tablespoon tomato paste
- ▢ ½ cup water (optional but can help mince the meat if that is the texture preferred)
- ▢ oil
- ▢ salt
- ▢ red chili powder
- ▢ chopped cilantro
Instructions
- Heat pan on medium heat and add oil. Once hot add finely chopped onions and saute until golden brown.
- Once the onions have slightly browned add the tomatoes, garlic, ginger, garam masala, tomato paste, salt, coriander powder, some chopped cilantro (optional), and turmeric.
- Allow the mixture to cook for about 3-5 minutes. At this point you can use a hand blender and puree the mixture if you would like. Then add the chicken. SIDE NOTE: I like to mix the ground chicken to remove the “stringed” meat look before cooking.
- Add water (optional). Using a spatula or a ground meat masher, begin to mash and mix the chicken with the tomato and onion mixture. TIP : flatten/squeeze the meat at the bottom of the pan while mixing if you do not have a meat masher. This will prevent the meat from bulking into large clumps.
- Continue to mix frequently for an additional 7-10 minutes on medium heat.
- Once all of the natural water has evaporated, cook for a few additional minutes so that the oil shines through.
- Garnish with the rest of the cilantro and serve.
- Enjoy as a taco stuffing, with wraps, as is with naan, or on top of pizza.
Nutrition
Want to keep the gluten but add more veggies? Then check out my Green Pizza Crust ! It is packed with greens and sure to be on repeat once you taste it.
I hope you enjoy this Indian Chicken Kheema Recipe as much as we do! Let me know what you think. I love hearing from you.

Kheema Pizza
Ingredients
- 1 large pizza crust (I prefer cauliflower crust)
- 1.5 cups kheema
- 1 cup finely shredded mozarella cheese
- ¼ cup diced onion
- ¼ cup finely chopped cilantro
- chopped chili peppers
Instructions
- Prep the pizza crust.
- Layer the chicken kheema onto the crust.
- Spread the mozarella cheese evenly on the pizza
- Top with cilantro, onions, and chili peppers.
- Bake until the cheese is melted and the crust is cooked through.
Nutrition
Recipe Courtesy of The Curry Mommy

Indian Chicken Kheema Recipe
Ingredients
- 1 lb ground chicken
- 1 tablespoon ginger, fresh and grated
- 1 tablespoon garlic, fresh and minced
- 1 teaspoon turmeric powder
- 2 tablespoon coriander powder
- 1-2 tablespoon garam masala
- 1 large onion, finely chopped, grated, or food processed
- 1 large beefsteak tomato, finely chopped
- 1 tablespoon tomato paste
- ½ cup water (optional but can help mince the meat if that is the texture preferred)
- oil
- salt
- red chili powder
- chopped cilantro
Instructions
- Heat pan on medium heat and add oil. Once hot add finely chopped onions and saute until golden brown.
- Once the onions have slightly browned add the tomatoes, garlic, ginger, garam masala, tomato paste, salt, coriander powder, some chopped cilantro (optional), and turmeric.
- Allow the mixture to cook for about 3-5 minutes. At this point you can use a hand blender and puree the mixture if you would like. Then add the chicken. SIDE NOTE: I like to mix the ground chicken to remove the “stringed” meat look before cooking.
- Add water (optional). Using a spatula or a ground meat masher, begin to mash and mix the chicken with the tomato and onion mixture. TIP : flatten/squeeze the meat at the bottom of the pan while mixing if you do not have a meat masher. This will prevent the meat from bulking into large clumps.
- Continue to mix frequently for an additional 7-10 minutes on medium heat.
- Once all of the natural water has evaporated, cook for a few additional minutes so that the oil shines through.
- Garnish with the rest of the cilantro and serve.
- Enjoy as a taco stuffing, with wraps, as is with naan, or on top of pizza.
Nutrition
Recipe Courtesy of The Curry Mommy
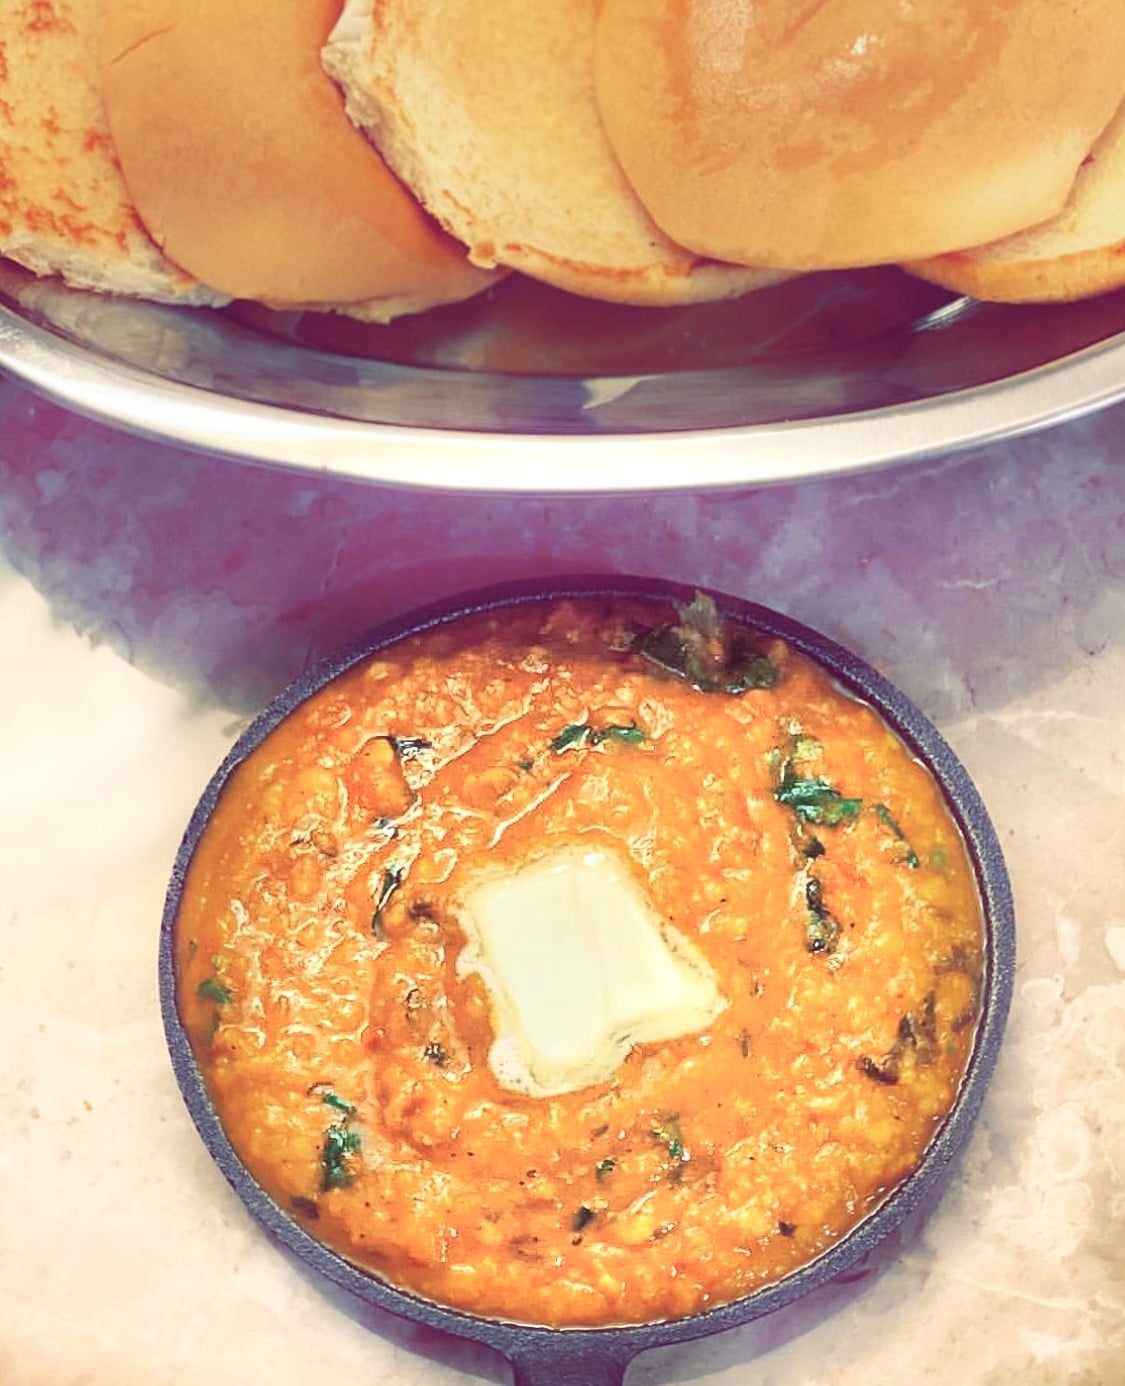
How to make Mom’s Bombay Style Pav Bhaji Masala Recipe !
This is Indian Street Food done right! Grilled butter bread paired with delicious Pav Bhaji Masala is how you can warm the soul of a true desi. Am I right or am I right?
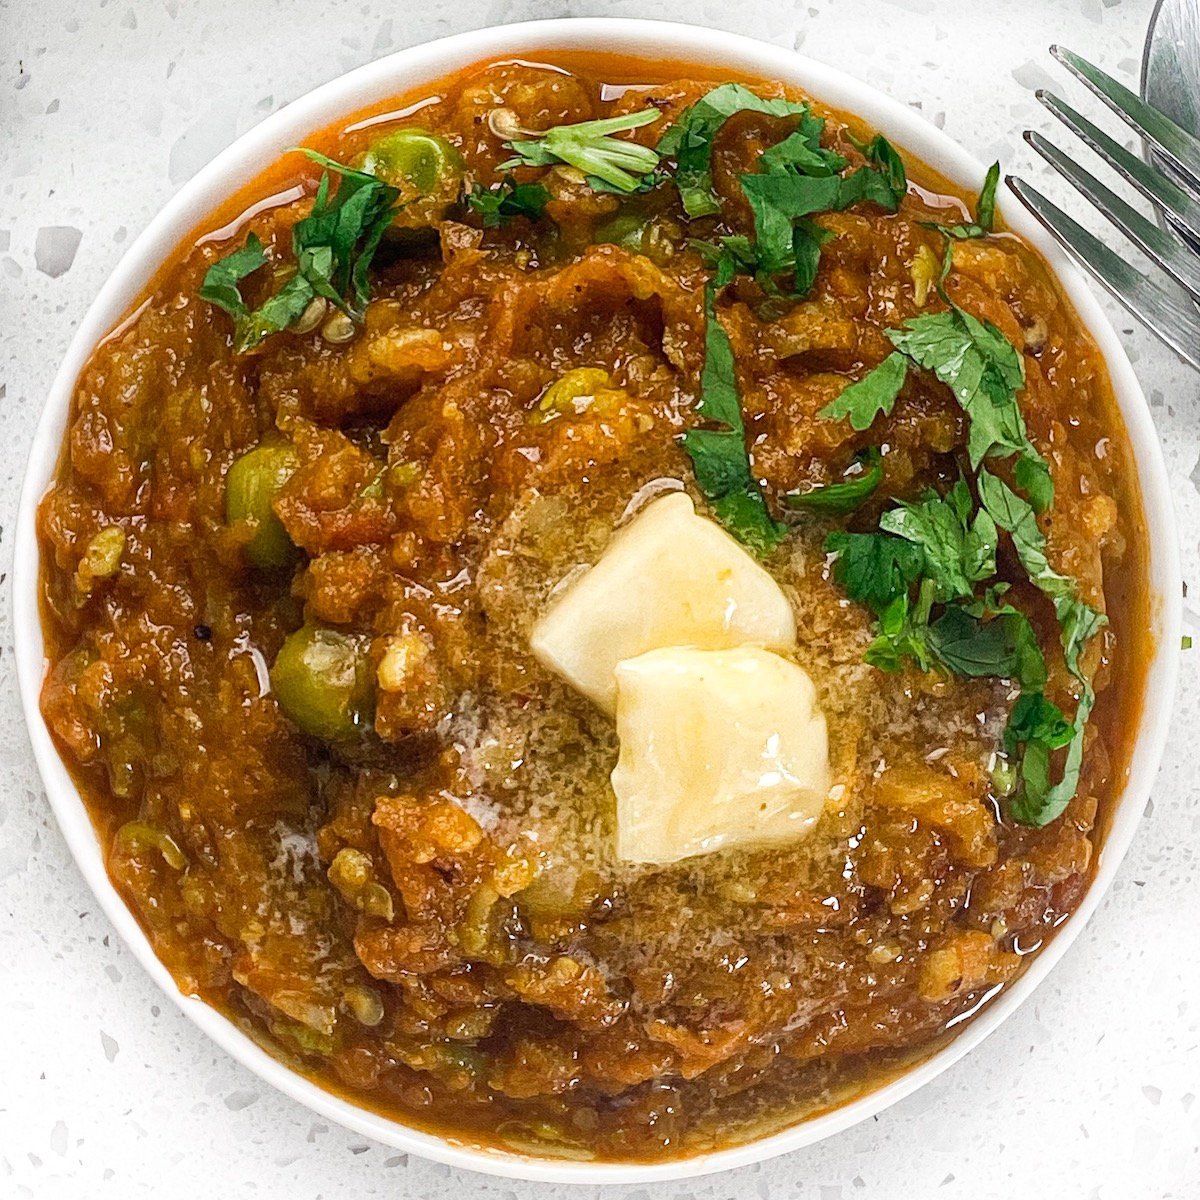
Why is this the best? The flavors, texture, and amount of cilantro… It all just comes together beautifully.
- Ingredients Needed
- How to Make Pav Bhaji
- Equipment needed
- Substitutions
- Pair it with…
- How to make the Pav
- Storage and Reheating
- Top Tips
- Secret Ingredient
- 📖 Recipe
- FAQ
- 💬 Community
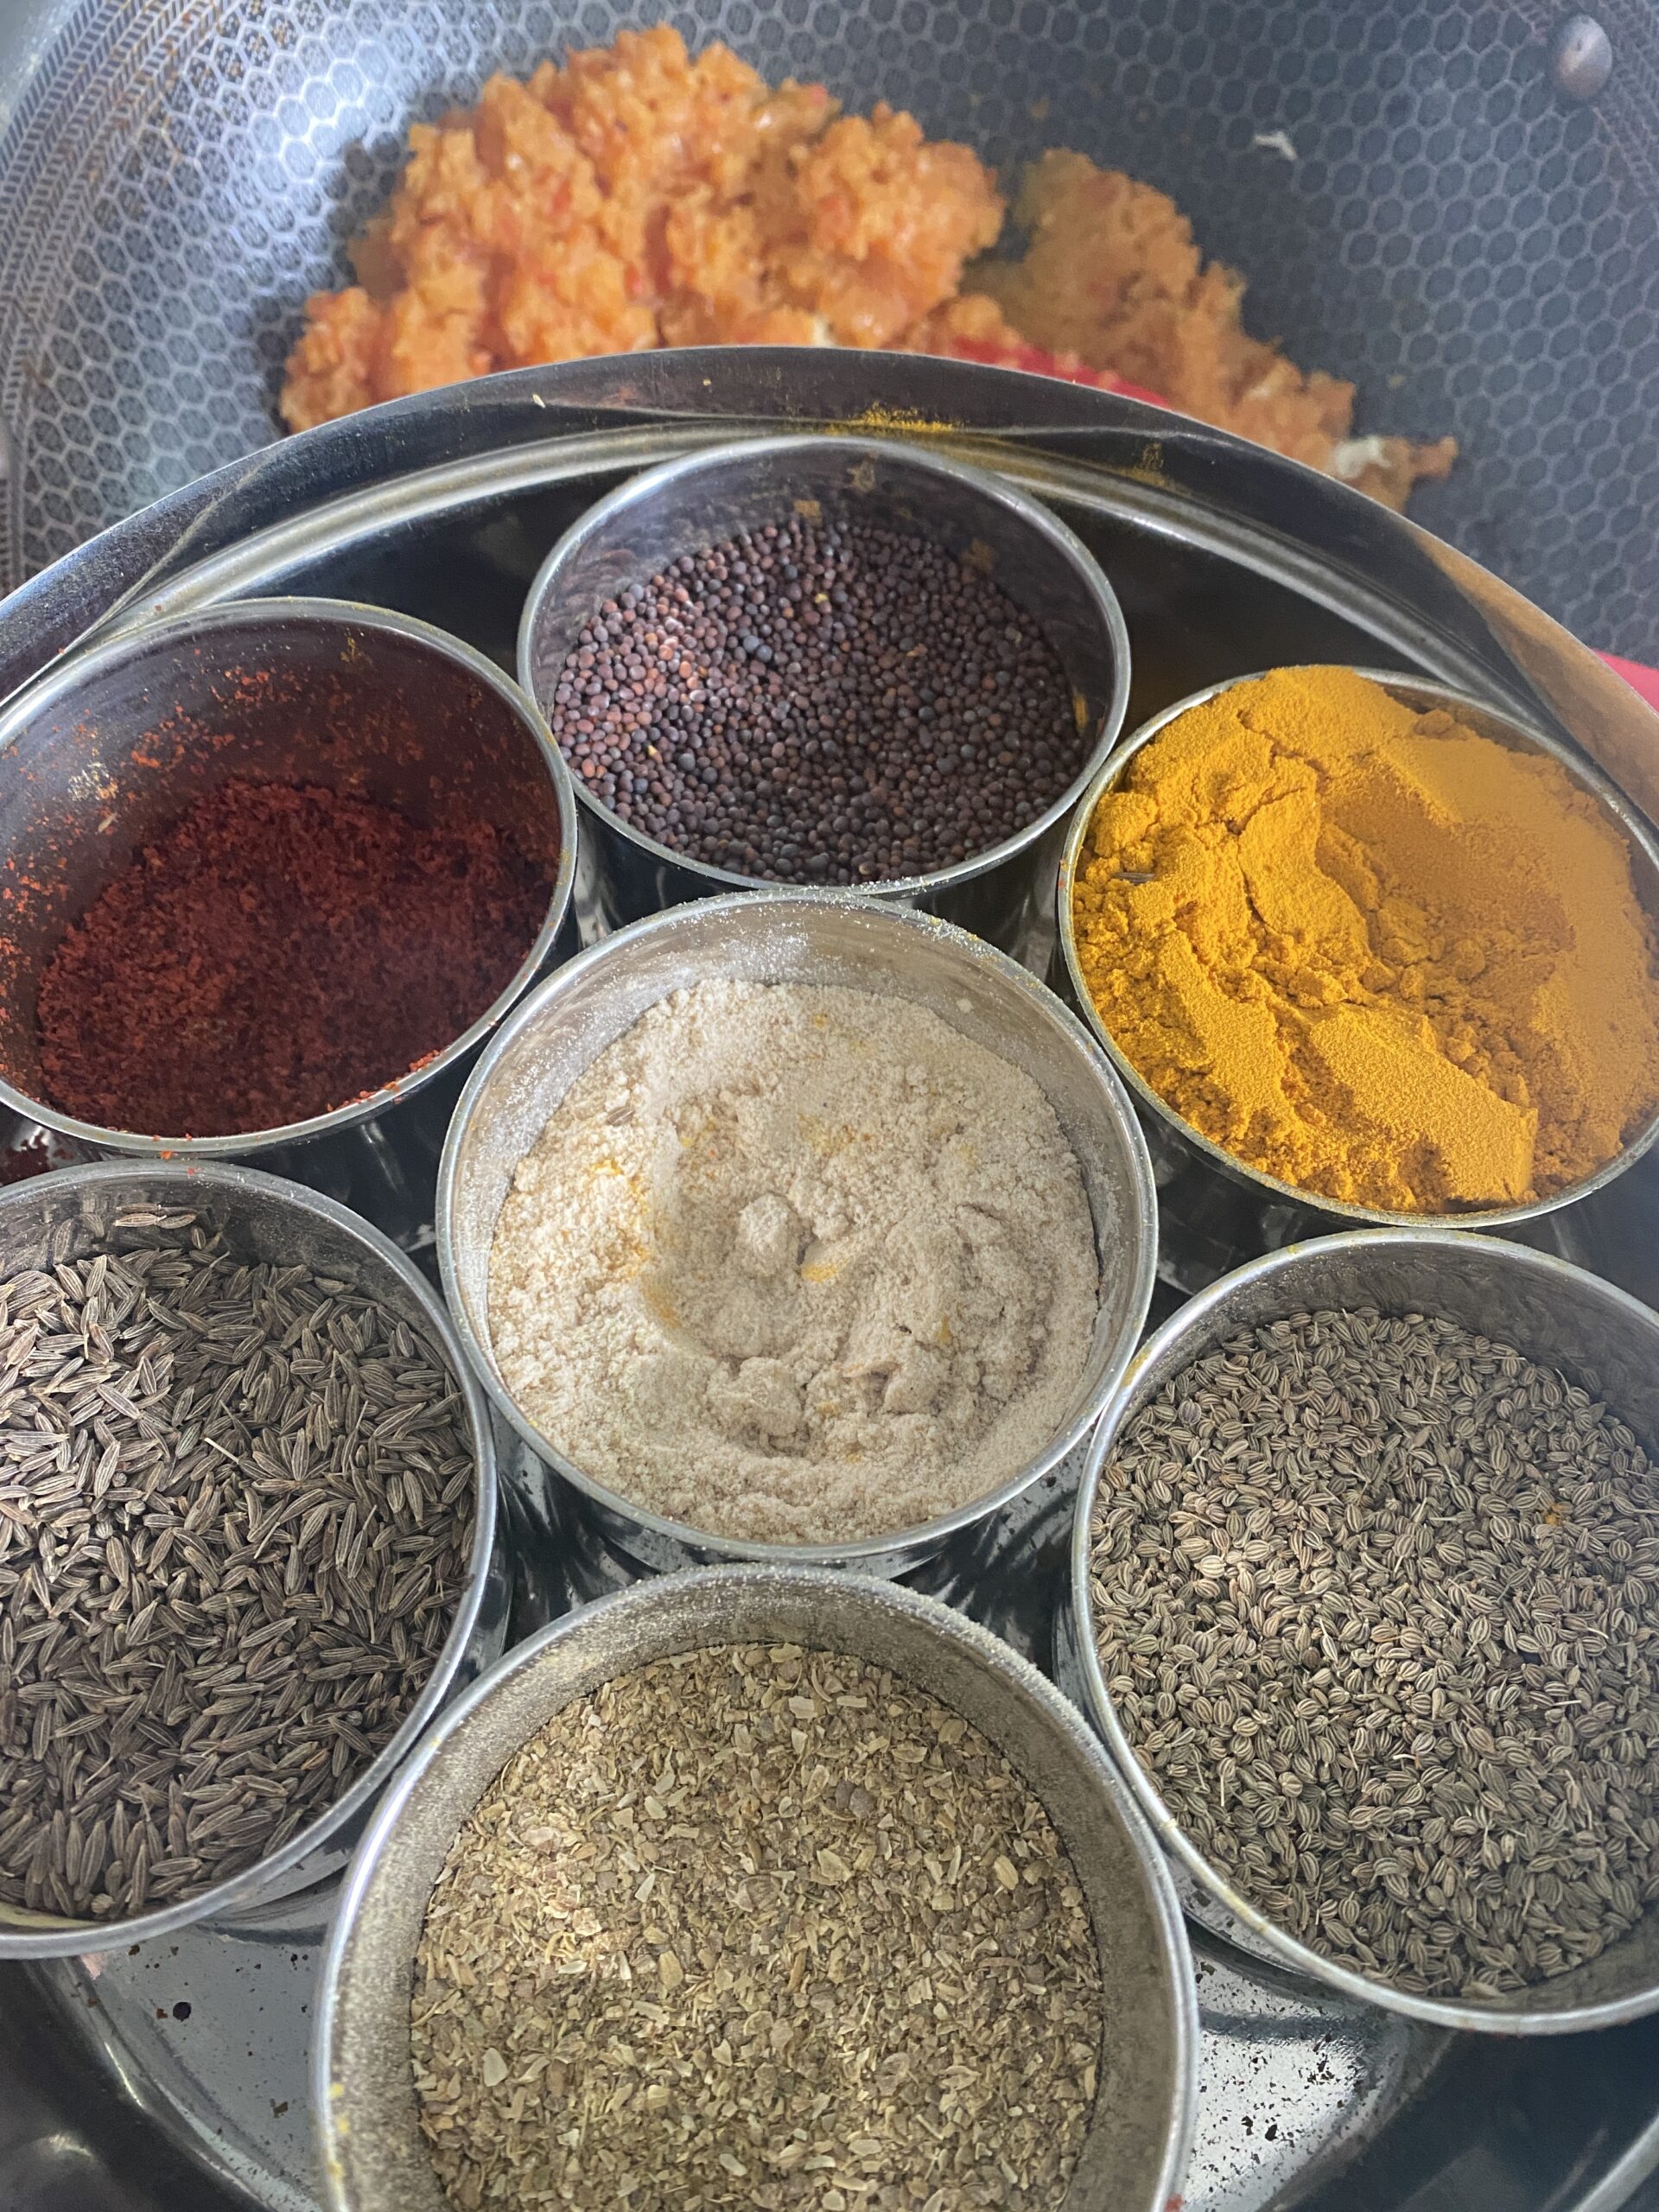
Ingredients Needed
Ingredients to steam or boil together.
- frozen petite peas - petite variation seems to work best for pav bhaji
- tomato
- carrots - can use baby carrots or large carrots. Purple or red carrots add a beautiful end color to the dish without distracting the flavors.
- russet potatoes - can substitute with white potatoes.
- cauliflower florets
Ingredients for the gravy
- yellow or red onion - cut finely or food processed
- vine ripened tomatoes or beefsteak tomatoes - finely chopped or food processed
- tomato paste - adds a great tang to the dish
- turmeric powder - can use fresh grated turmeric
- garlic - preferabbly fresh and grated/blended
- ginger - fresh and grated
- Bombay Bhaji Pav Masala - I love Badshah or Everest Brands
- butter - try it with Amul Butter for an authentic flavor
- cilantro - stems and leaves are preferred
- red chili powder
- lemon/lime wedge
- oil, water, salt
Details and quantities can be found in the recipe card below.
How to Make Pav Bhaji
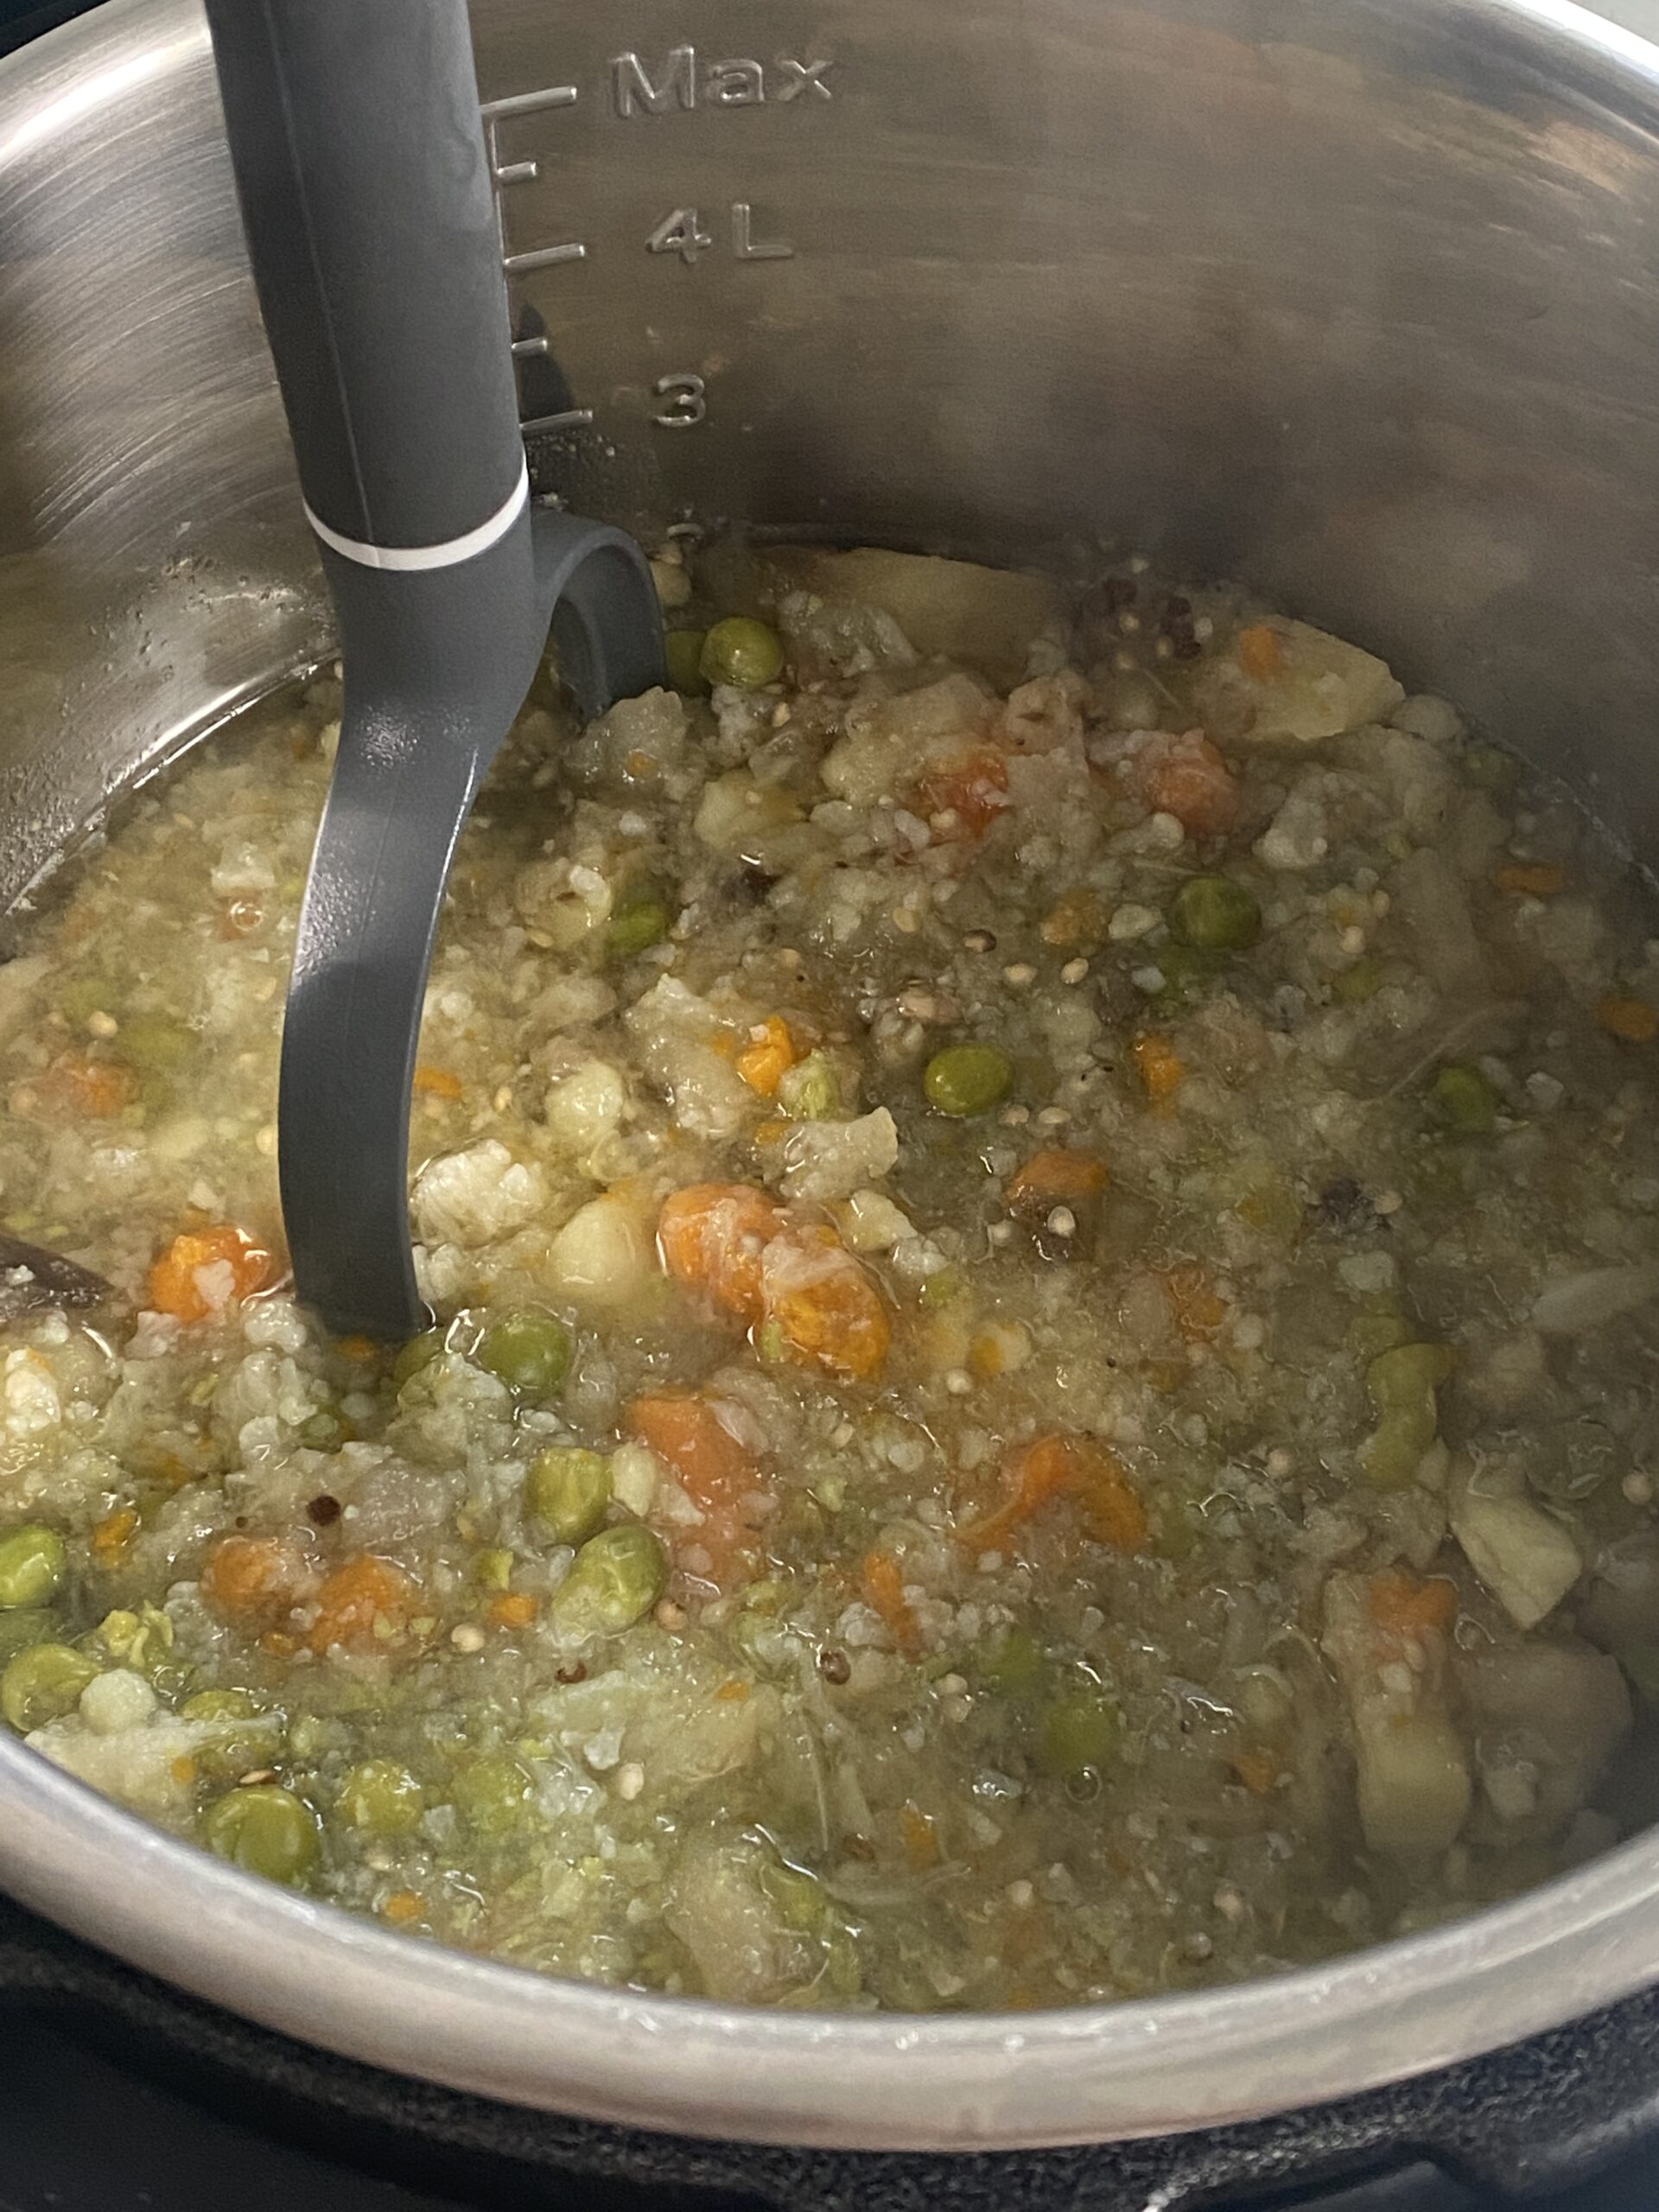
Steam/boil the vegetables in an Instant Pot or traditional pressure cooker.

Mash the vegetables and set them aside.
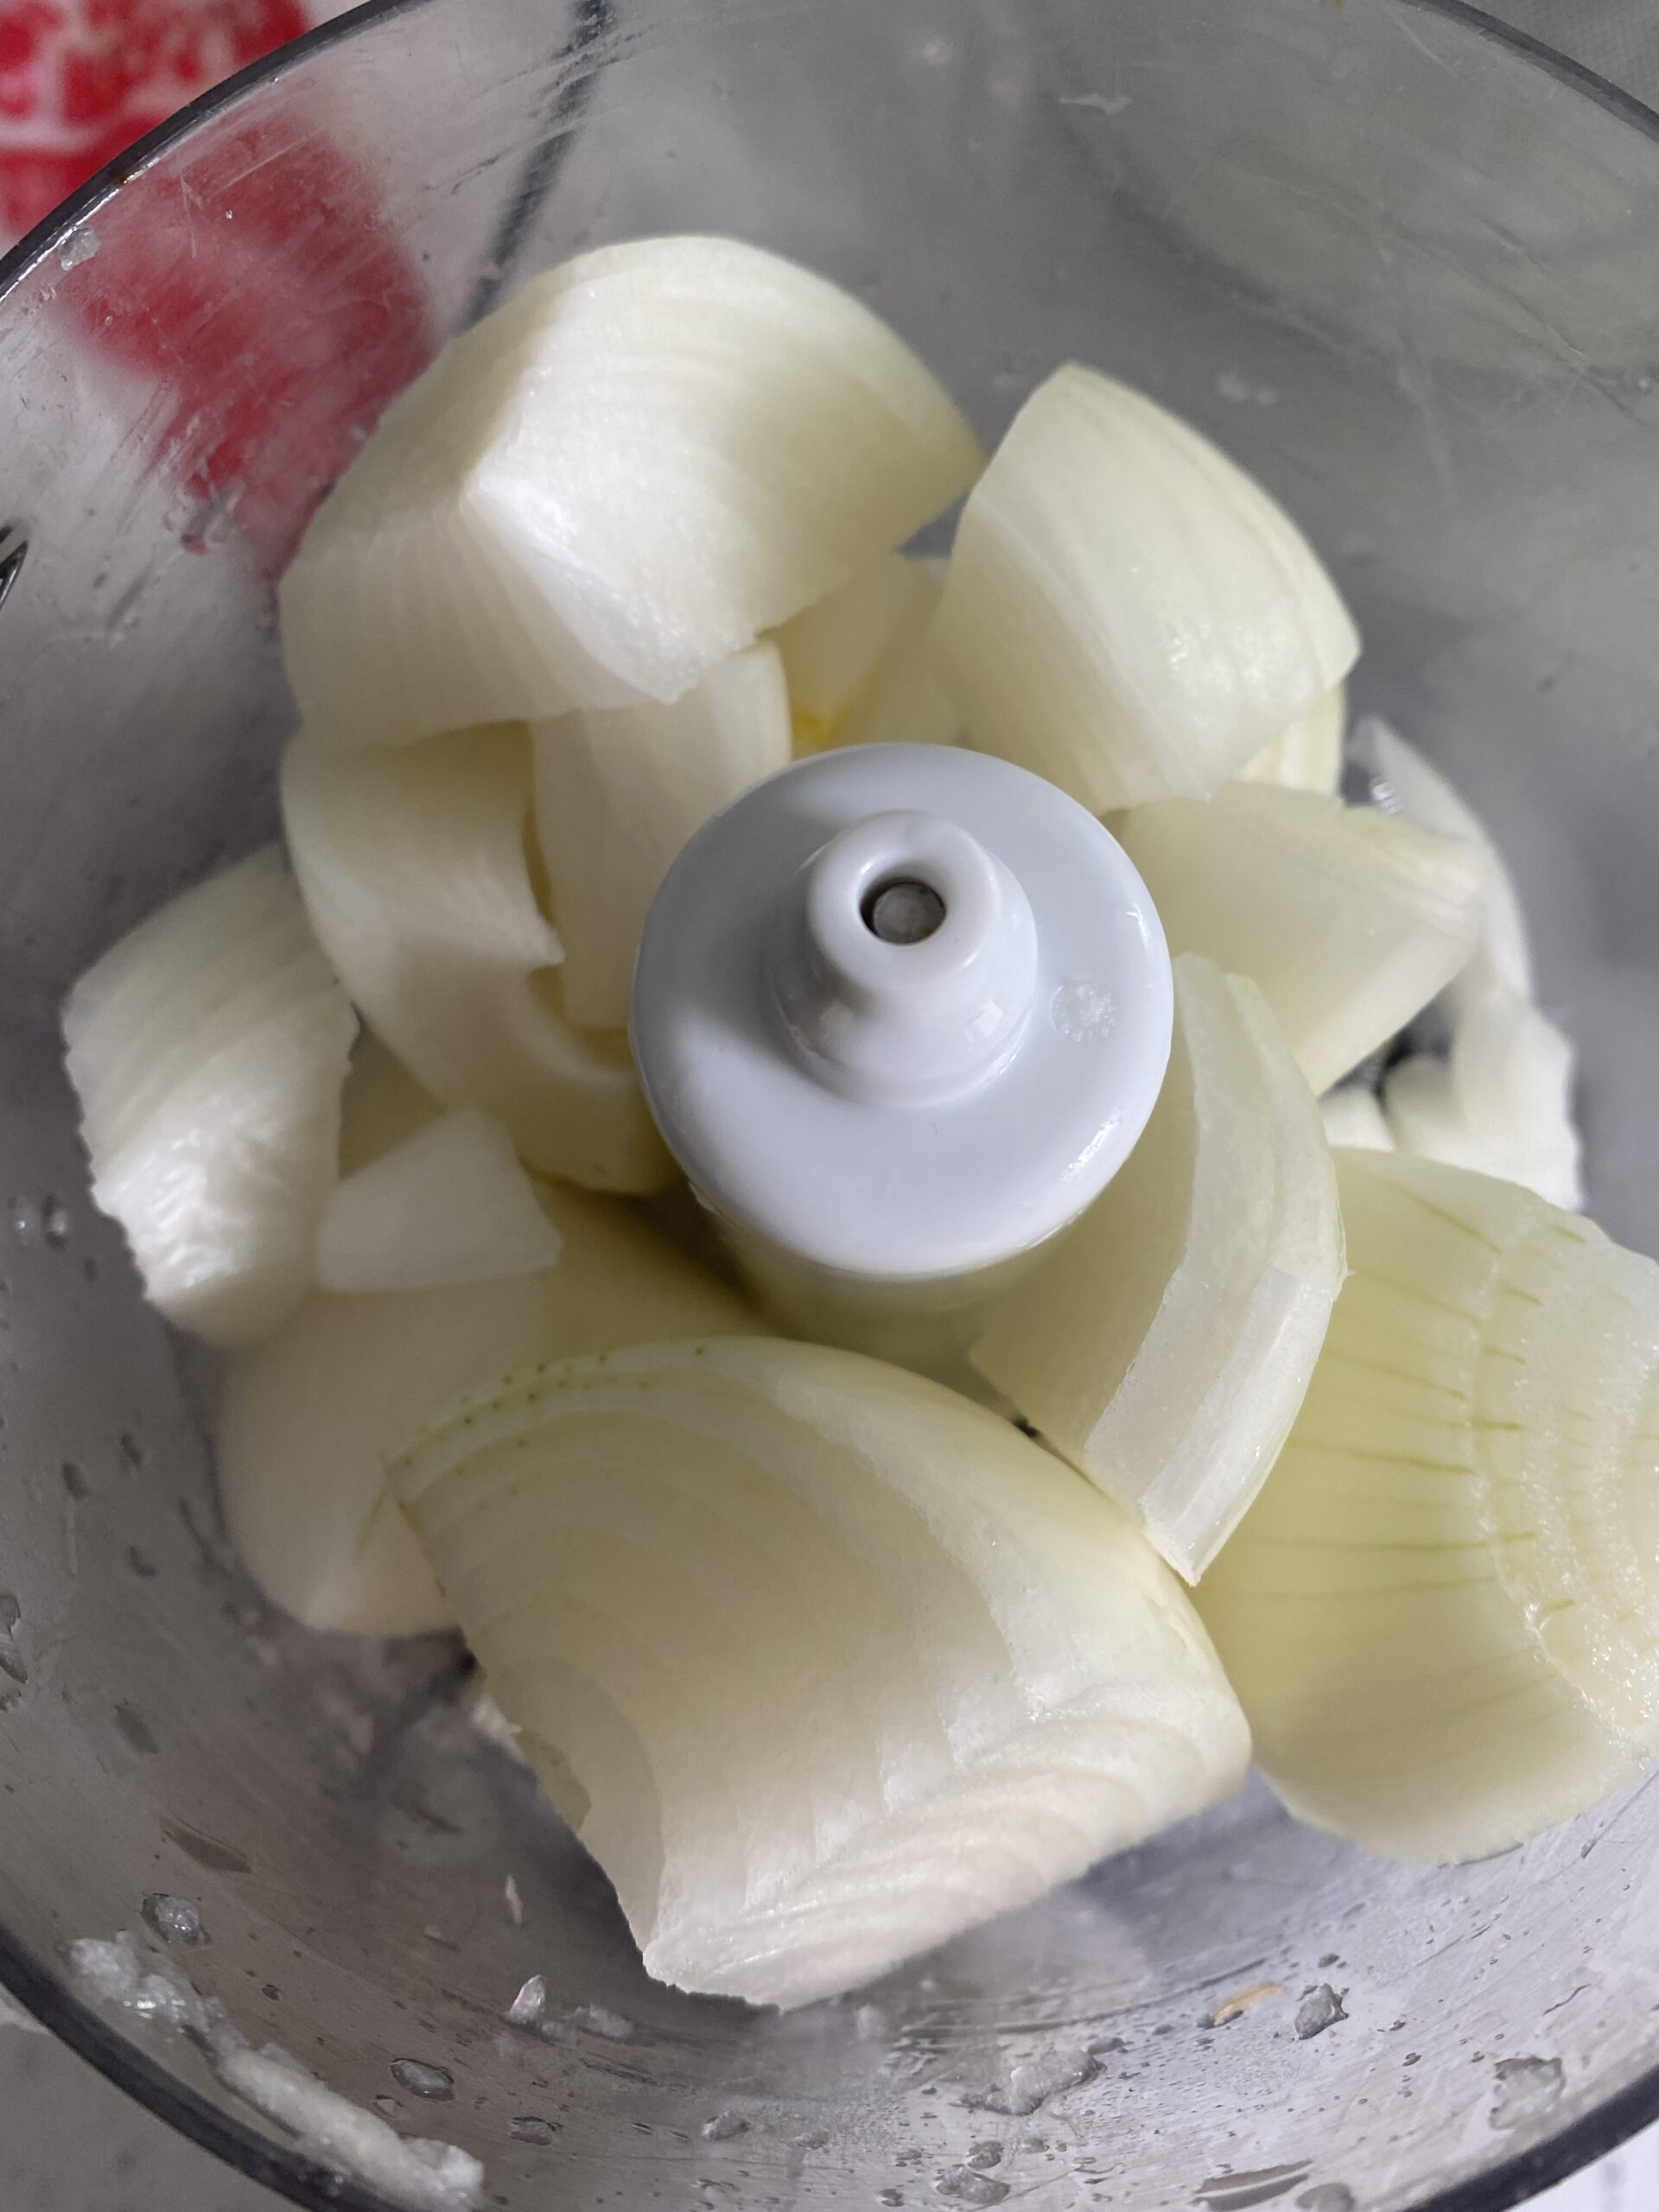
In a food processor blend the onions.
Cook the onions until brown.

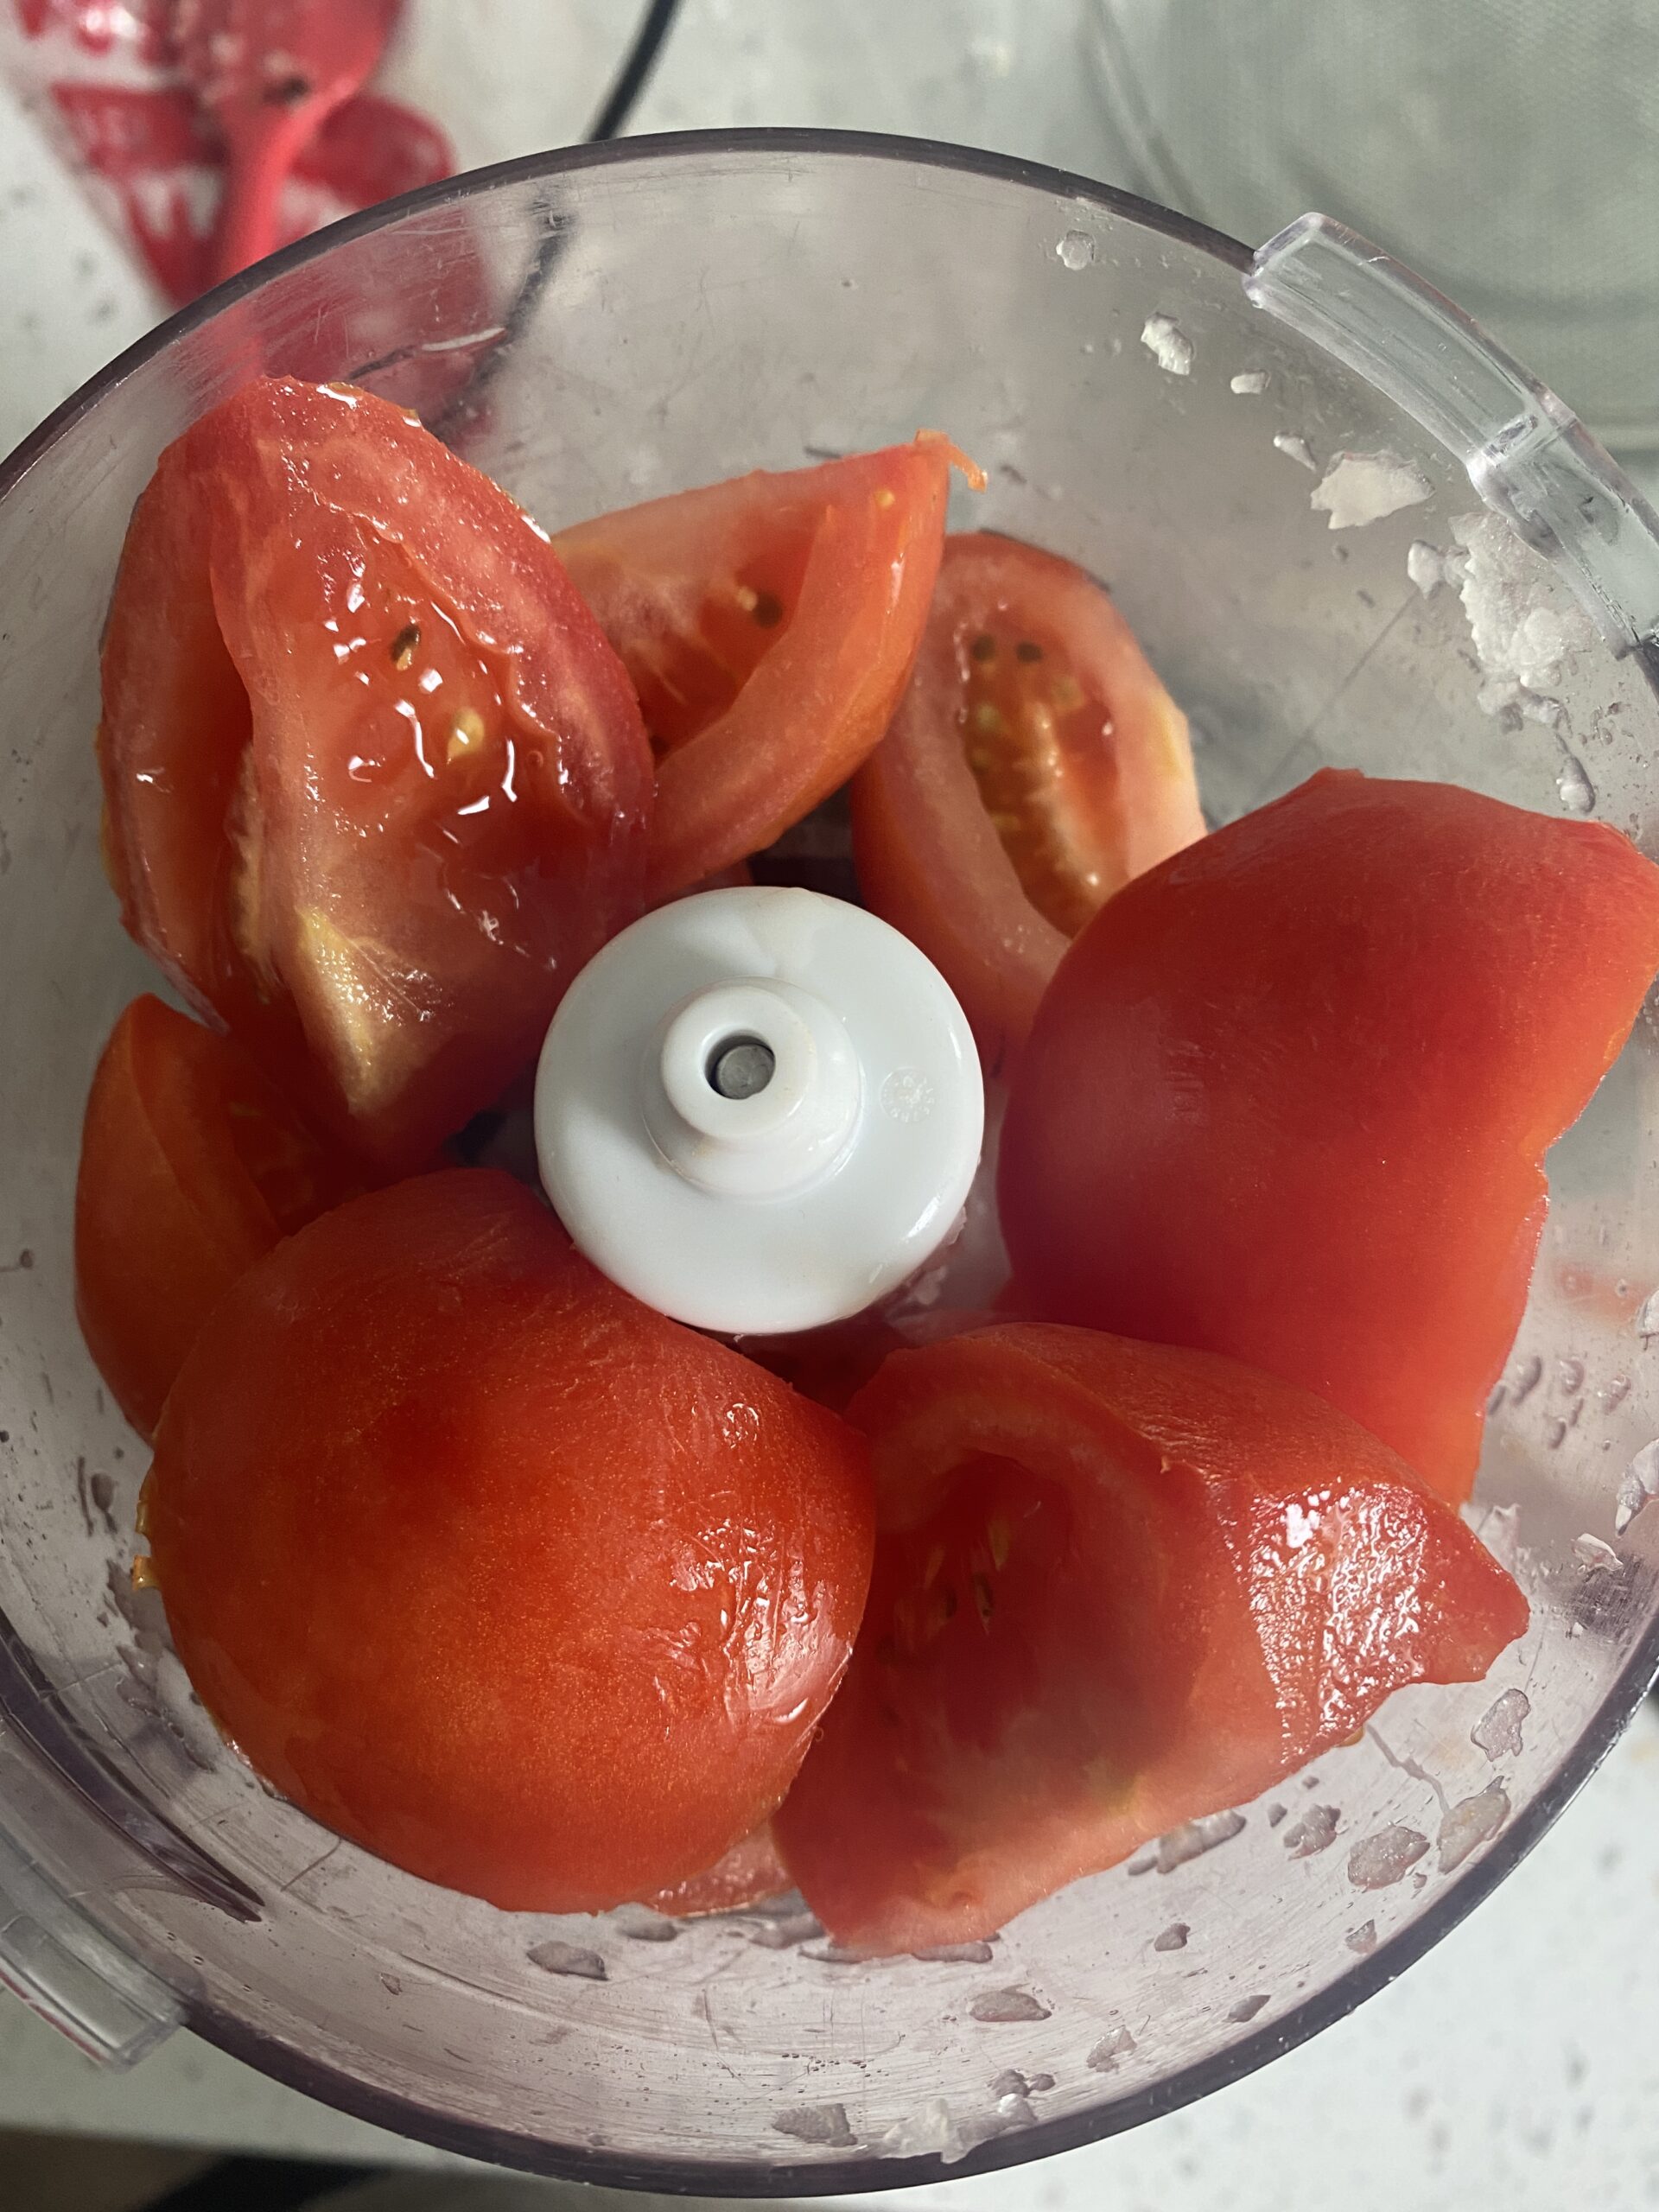
Chop the tomatoes in the food processor and add them to the pan.
Once the tomatoes have cooked through, add the spices and tomato paste.
Mix well and let it cook for a few minutes while continuing to mix.

Slowly combine the mashed vegetables into the gravy, in the wok.
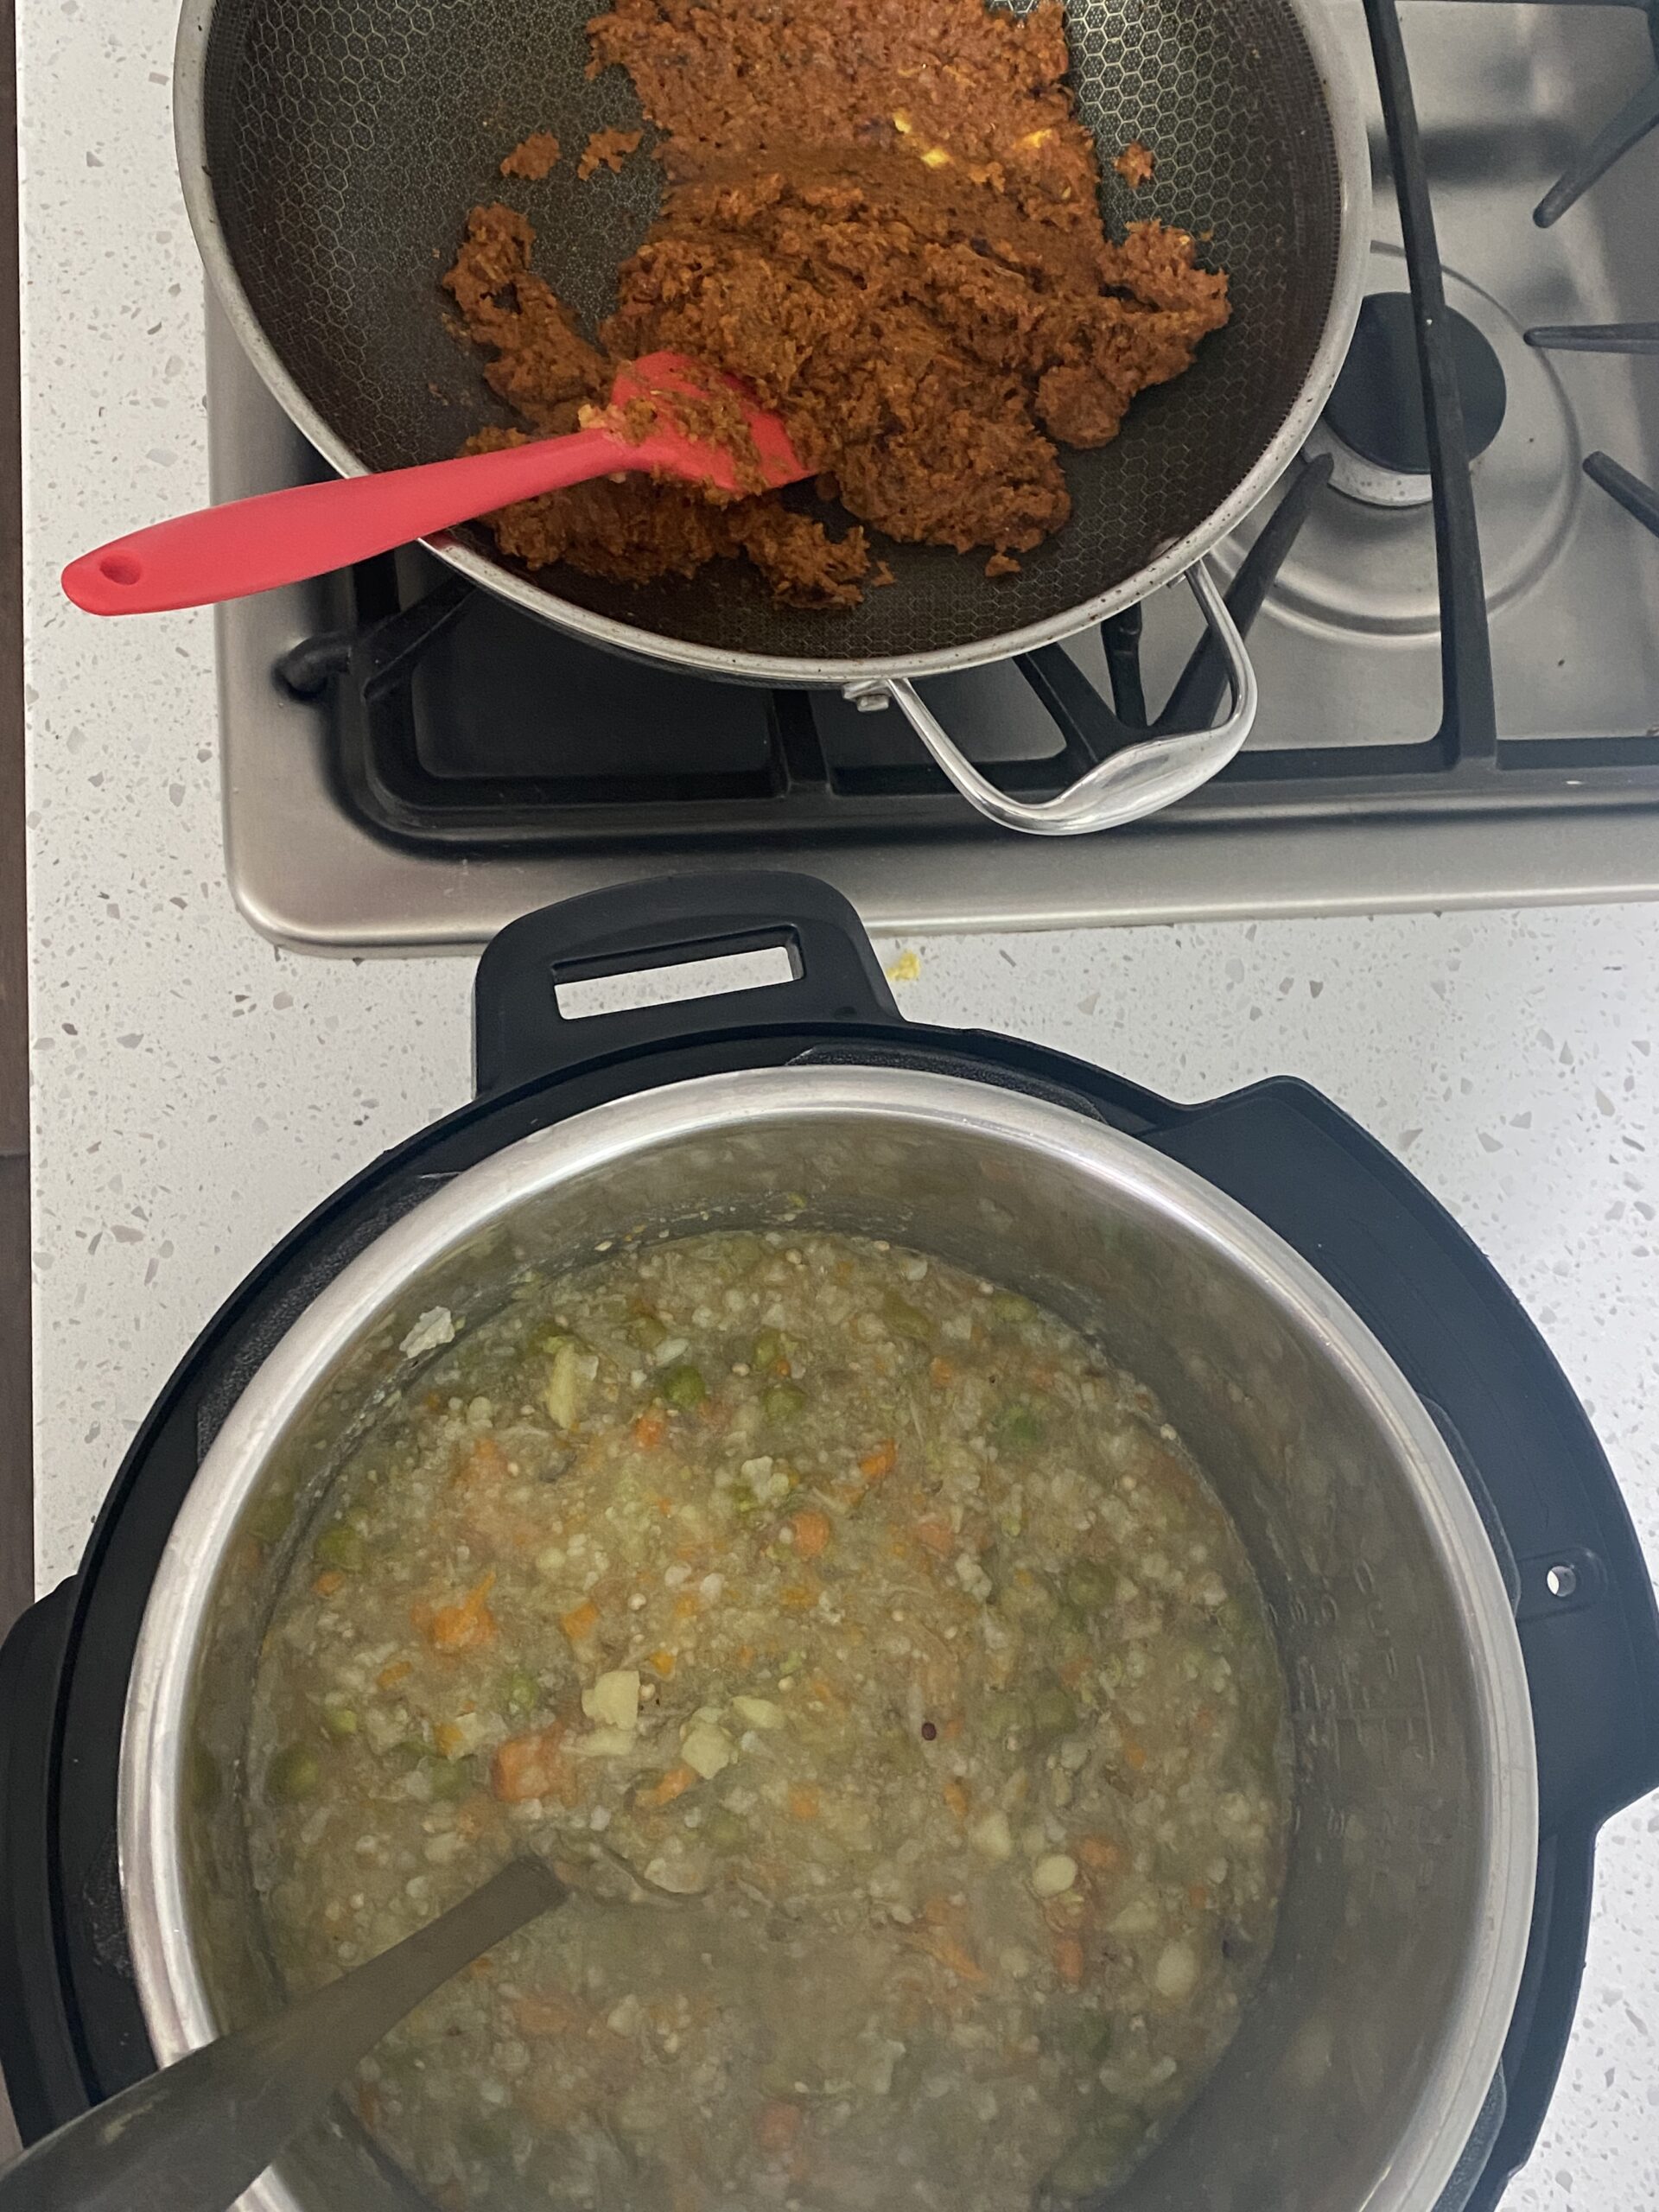
Mix it well, let it simmer for about 5 minutes, and then add extra pav bhaji masala, butter, and salt after a taste test.
Serve with grilled butter bread.
Equipment needed
- Pressure Cooker or Large Pot - to steam/boil the vegetables
- Large Wide Pan/Wok - to make the dish
Substitutions
Carrots- Add eggplant if you prefer more vegetables.
Pav Bhaji Masala- Use garam masala
Pair it with…
- A side salad - Combine chopped onions, tomatoes, cilantro, salt, red chili powder, and lemon juice together.
- Bread - warm and butter grilled hot dog or burger buns
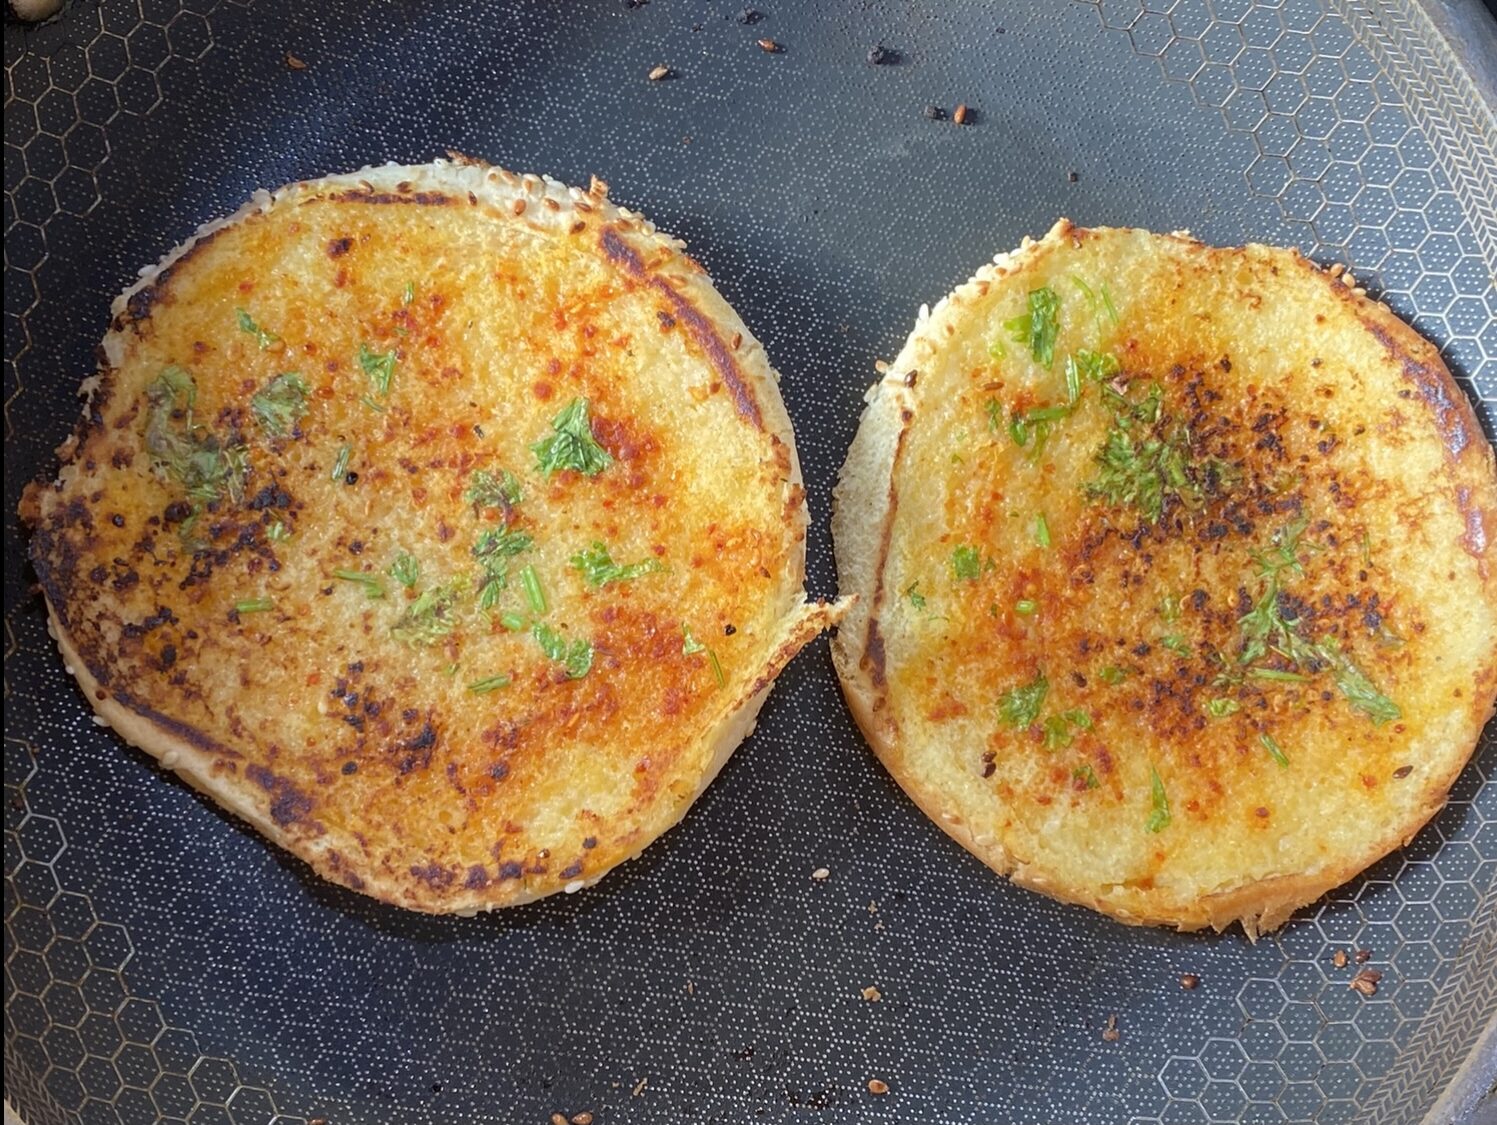
How to make the Pav
- On white bread, spread margarine and then sprinkle with sambar masala (or red chili powder), and cilantro
- Grill them with butter side down on a medium/high heat pan until brown.
- Cook the second side to warm and serve
Storage and Reheating
Freezing- Store the cooled Bombay-style pav bhaji in pre-labeled Ziplock bags and lay them flat in the freezer until they are solid ice. After it is frozen, you can place it anywhere in the freezer for better storage.
Defrosting- Take it out of the freezer and either let it sit at room temperature for about 8 hours or in the refrigerator for 24 hours.
Reheating on Stove Top - Place a pan on the stove and heat equal parts oil and unsalted butter. Let it melt. Add the defrosted bhaji to the pan and slowly mix in some water to reach the consistency you prefer.
PC: Anisha
Top Tips
- Add shredded paneer to make Paneer Cheese Pav Bhaji Masala
- It freezes really well!
- Beefsteak or vine ripened tomatoes taste best
- Purple or red carrots give the bhaji a beautiful color
- Finally, the amount of cooked tomato+onion gravy should equal that of the mashed vegetables.
Secret Ingredient
Cook with love! That’s all 🙂
📖 Recipe

The Best Bombay Style Pav Bhaji Recipe
Equipment
- ▢ Pressure Cooker
- ▢ Wok/Large Pan with Lid
- ▢ Cutting Board and Knife
- ▢ Smasher
- ▢ Spatula to mix and serve
- ▢ Grater or Chutney Machine
- ▢ Measuring Cup
Ingredients1x2x3x
Steam and Mash Vegetables
- ▢ ½ cup frozen petite peas
- ▢ ½ cup chunk chopped, fresh carrots (red or purple will give off a darker end color)
- ▢ 2½ cups chunk chopped, russet potatoes
- ▢ 1 cup cauliflower florets
- ▢ 2-3 cups water, for steaming/boiling
- ▢ 1 medium tomato, chunk chopped (about ½ cup)
Gravy/Sauce
- ▢ 1 ½ cup yellow or red onion, finely diced/food processed (not pureed)
- ▢ 2½ cup tomatoes, finely diced (use beefsteak or vine ripened)
- ▢ 1 tablespoon tomato paste mixed with 2 tablespoon of water
- ▢ 1 teaspoon turmeric powder
- ▢ 1.5 teaspoon fresh minced garlic
- ▢ 1 teaspoon fresh grated ginger
- ▢ 2 teaspoon pav bhaji masala (badshah brand bombay bhaji pav is my favorite)
- ▢ ½ stick salted butter
- ▢ 1 cup finely chopped cilantro + more for garnishment
- ▢ red chili powder
- ▢ very generous amount of peanut oil (corn oil can be a substitute)
- ▢ salted butter as garnishment/topping
- ▢ fresh chopped green garlic-optional
Instructions
STEAM AND MASH VEGETABLES
- Place all of the vegetables in the “steam and mash vegetable” category in an Instant Pot. Close the lid, set the vent to sealing, and set it to 5 minutes high pressure.
- Let the Instant Pot cool down completely before opening.
- Mash the vegetables with a masher VERY slightly (do not puree).
- NOTE: Feel free to use a traditional pressure cooker or a pot with water instead of an Instant Pot.
SPICED MASALA GRAVY
- Heat a generous amount of oil in a pan on medium-high heat. (⅓ cup)
- Add the finely diced onions and cook until golden brown.
- Add the tomatoes and mix well. Cook for a minute or two.
- Add ginger, garlic, turmeric, red chili powder, and ½ of the pav bhaji masala.
- Mix well and lower the head to medium.
- Add the tomato paste + water mixture and combine well.
- Cook until the water from the tomatoes has completely evaporated (about 1-2 minutes)
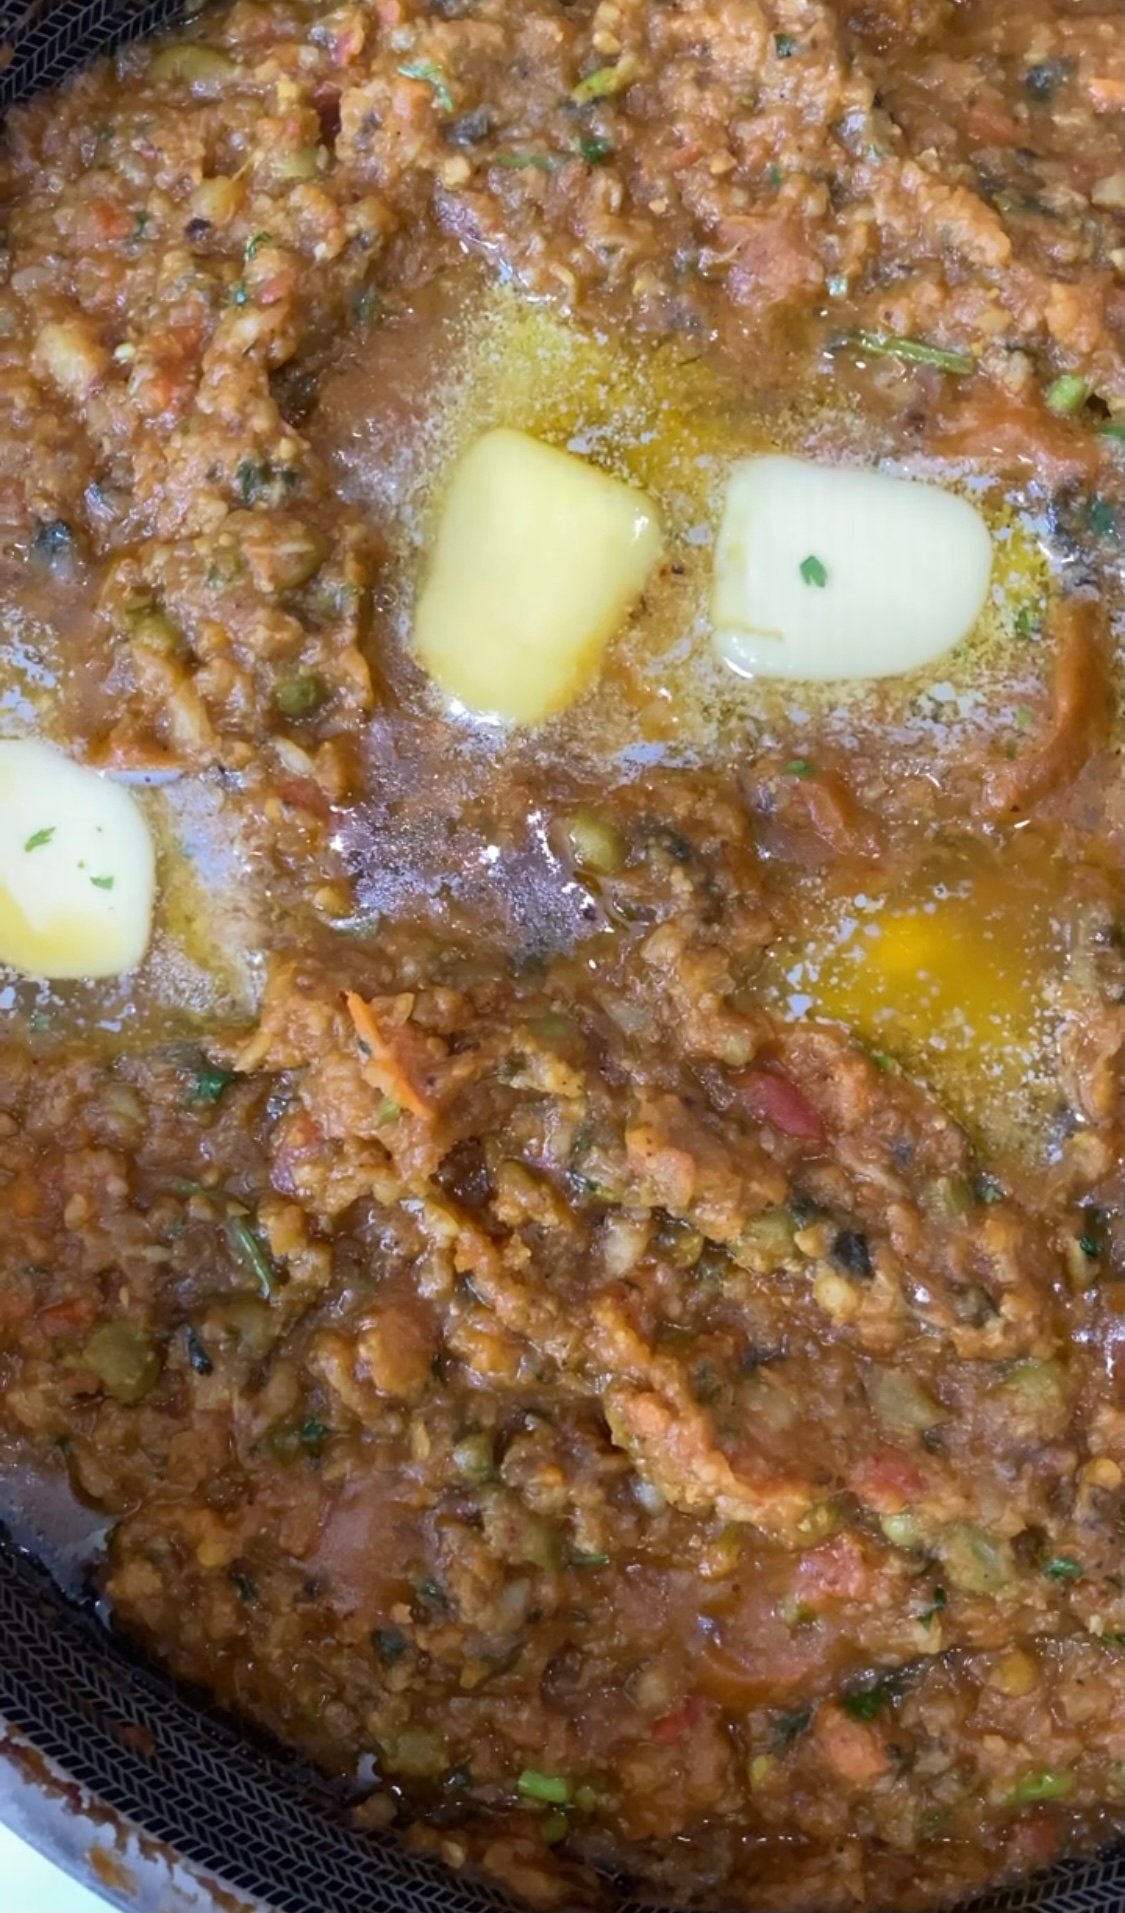
- Mix in the mashed vegetables, add extra water (if preferred) until it reaches a consistency you prefer and then let it come to a simmer.
- Add ½ stick of salted butter and continue to let the bhaji simmer for another few minutes. This is a key step
- Add the remainder of the pav bhaji masala and all of the cilantro.
- Taste test and add salt accordingly.
- Mix and plate it with a tablespoon cut/chunk of salted butter, more fresh cilantro, and optional fresh green garlic.
- Serve it with warm butter grilled bread + onion and tomato salad.
Notes
- Add salt at the very end since ingredients for pav bhaji masala, salted butter, and tomato paste can already have it as an ingredient.
- Try not to puree the vegetable mix. Slightly mashing it works best.
- Using a generous amount of oil will get you a real Indian street food taste.
- Amul Butter can be added for a more Bombay authentic taste.
- Add shredded paneer to the top of the pav bhaji for paneer pav bhaji
As told by my Dad, it originated like a “clean the fridge” meal. Instead, there were no refrigerators back in the day, so households would use up all the vegetables that were going to go bad and make pav bhaji.
Yes, by a long shot! Regardless of dietary restrictions, this is one recipe that can be consumed by gluten-free diets, keto believers, vegans, and just those who are wanting to include more vegetables in their lives
My biggest tip is to use freezer-friendly bags or containers. Fill them up, once the food has completely cooled down. Close them shut and lay them flat in the freezer.
