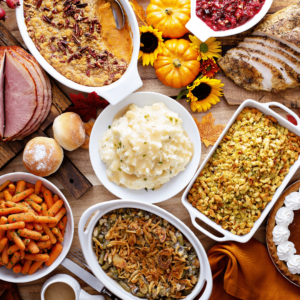
Here is a full traditional Thanksgiving Day menu list for your planning needs!
I am all about having traditional American Thanksgiving food on this one day but I understand if you want to incorporate an Indian Thanksgiving Menu on this special day. With that said, here you will find all of the recipes I make for the festive holiday.
homemade gourmet mac and cheese
I understand everyone has different traditions so if you want to add a twist to the original (like I did with the One Pot Mexican Mac and Cheese ), then please be sure to do so!
What’s on the menu?
One of the hardest things to do is come up with a list of items to put on a menu when having a holiday gathering. I was born and raised in the southern part of the United States, so having a Traditional Thanksgiving was a must! But we looked out for those who were vegetarians and would incorporate some Indian dishes into the menu as well.
What dishes to add for vegetarians?
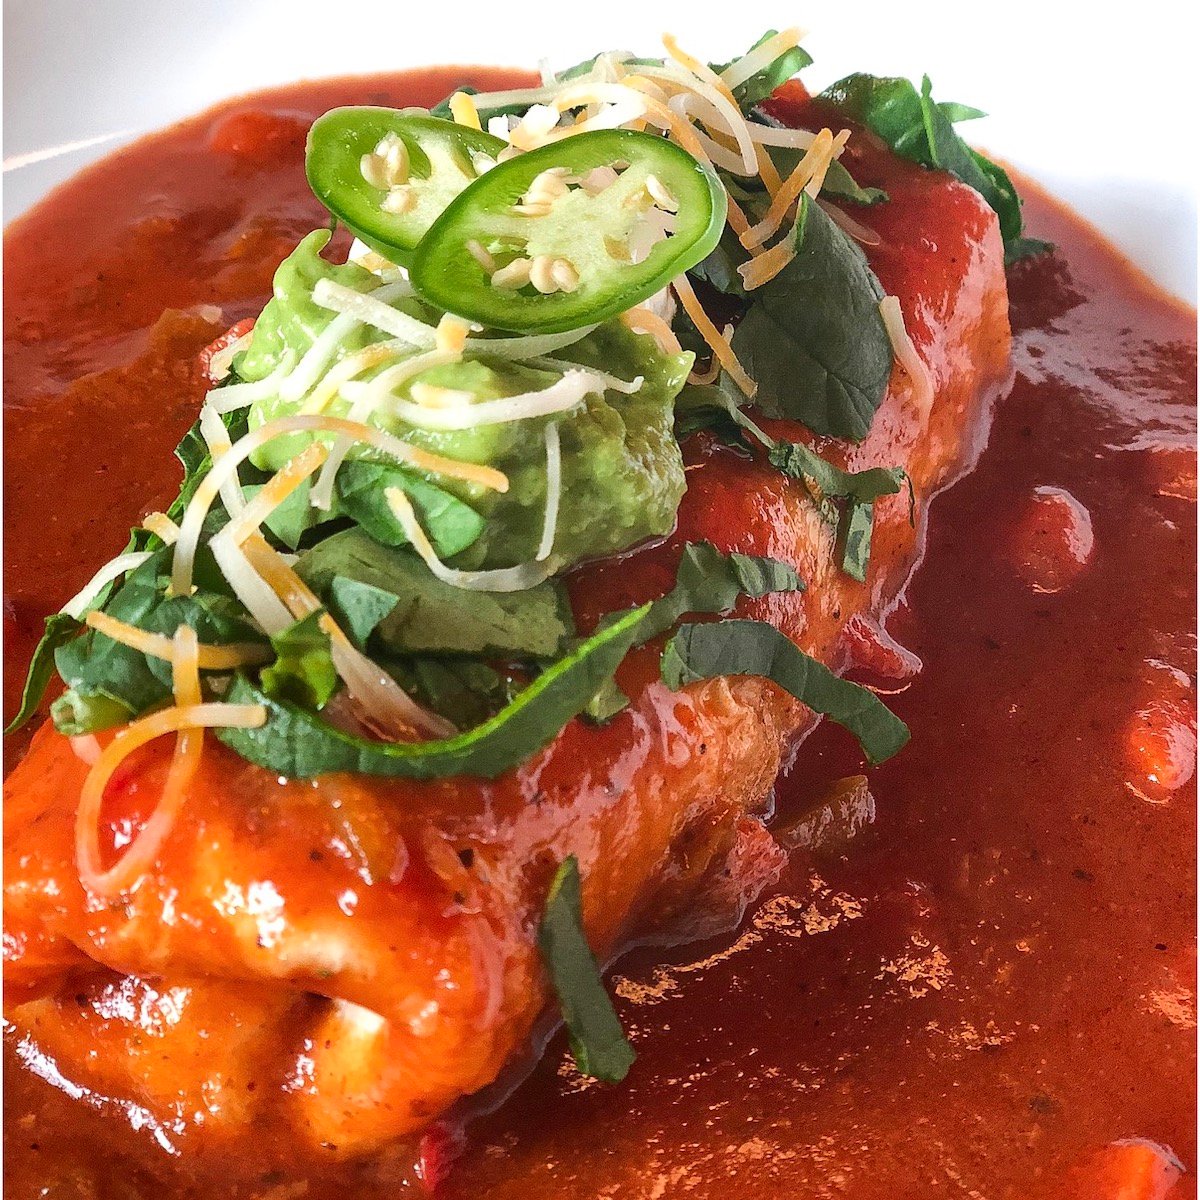
Smothered Vegetarian Burritos
We have done Idli Sambar, Enchiladas, or Lasagna in the years past with the addition of many appetizers. Regardless of what you add, just know that we all have our own traditions and that the whole reason to gather is to be thankful for each other!
Indian Thanksgiving Menu is one with Indian recipes. However, since it is Thanksgiving I like to throw in traditional recipes as the main part of the meal. In fact, they are a must! So, whether you are having a mix of traditional and non-traditional items on your menu, I have you covered with a complete list below.

Vegetarian Main Course Recipe Ideas
Sev Usal never disappoints for gatherings! It’s like a bowl of comfort for every desi.
- Creamy Tahini Pasta
- Gulab Jamun Cupcakes
- Sev Usal Recipe
- Paneer Butter Masala Recipe (Paneer Makhani)
Expert Tips
A full 72 hours in the refrigerator is recommended.
A large platter of enchiladas or lasagna works well for adults and kids.
Recipes for Thanksgiving!
Here is a complete list of my homemade recipes for Thanksgiving!
Candied Yams (sweet potato casserole)
📖 Recipe
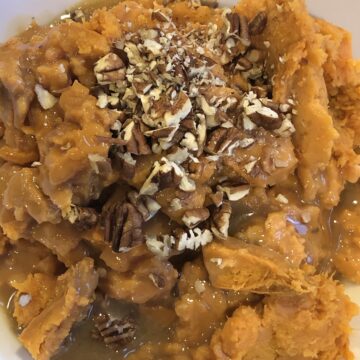
Thanksgiving Candied Yams with Pecans
Equipment
- ▢ Oven safe pan
- ▢ Foil Paper
- ▢ bowl
- ▢ Butter Pot
- ▢ whisk
- ▢ spatula
- ▢ Cookie Cutter (optional)
Ingredients1x2x3x
- ▢ 4 cups sweet potatoes, that have been peeled, cube chopped, and boiled/steamed
- ▢ 3 tablespoon salted butter
- ▢ 2 cups marshmallows
- ▢ ¼ cup chopped pecans (+ extra for garnish)
- ▢ ¼ cup brown sugar
- ▢ ¼ cup heavy whipping cream (or milk)
- ▢ ⅛ teaspoon cinnamon powder (optional)
Instructions
- In a large bowl, add half of the sweet potatoes and mash them well.
- Add the other half of the sweet potatoes but do not mash them. Keep them cubed.
- Add the pecans and cinnamon powder to the bowl.
- In a small butter pot, brown 2 tablespoon of the butter. Add heavy whipping cream/milk and the sugar. Let it come to a simmer on low heat making sure to stir/whisk the whole time.
- Mix the butter pot contents with the sweet potatoes in the bowl.
- Put the sweet potatoe mixture in an oven safe pan and spread it out evenly with a spatula so the top has a flat surface.
- Brown the additional 1 tablespoon of butter and pour it over the sweet potato mixture. Try to be as even as possible. Feel free to use more butter if you need to (It’s Thanksgiving! Go big folks.)
- Layer the marshmallows on top of the candied yams. Get pretty with it! Use some extra pecans and write your family’s surname; use a cookie cutter and have a pattern/leaf in the middle; alter lines of pecans and marshmallows… or be simple and just use marshmallows on top.
- Tightly cover the oven safe pan with foil paper. Leave air in the middle so the foil does not touch the marshmallows at all.
- Bake for 10 minutes at 350.
- Uncover the foil and bake again for 3-5 minutes.
- If you prefer to brown your marshmallows even more, broil them on low heat for 1-2 minutes (keep an eye on them though).
- Serve HOT!
Green Bean Casserole
📖 Recipe
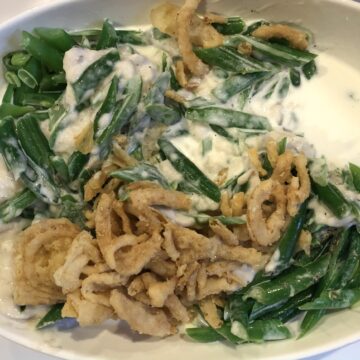
The Common Thanksgiving Green Bean Casserole
Equipment
- ▢ bowl
- ▢ spatula
- ▢ Oven safe pan
- ▢ Foil Paper
Ingredients1x2x3x
Casserole
- ▢ 4 cups green beans, chopped and steamed (slice lengthwise in half, and then 1 inch pieces… trust me)
- ▢ 1 can Campbell’s cream of mushroom soup (10oz)
- ▢ 4 oz French’s fried onions
- ▢ ⅛ teaspoon fresh coarse black pepper (more or less)
- ▢ 1 cup milk or heavy cream
Topping
- ▢ 4 oz French’s fried onions
Instructions
- In a large bowl, mix everything together for the casserole (save time and mix it in the oven safe pan you will be cooking in)
- Place the mixture in an oven safe pan and cover tightly with foil.
- Bake at 350 degrees for 15 minutes (if your green beans are cold, add 5 minutes to the timer).
- Uncover the foil and layer the French’s Fried Onions on top.
- Bake for an additional 10 minutes.
- Serve hot!
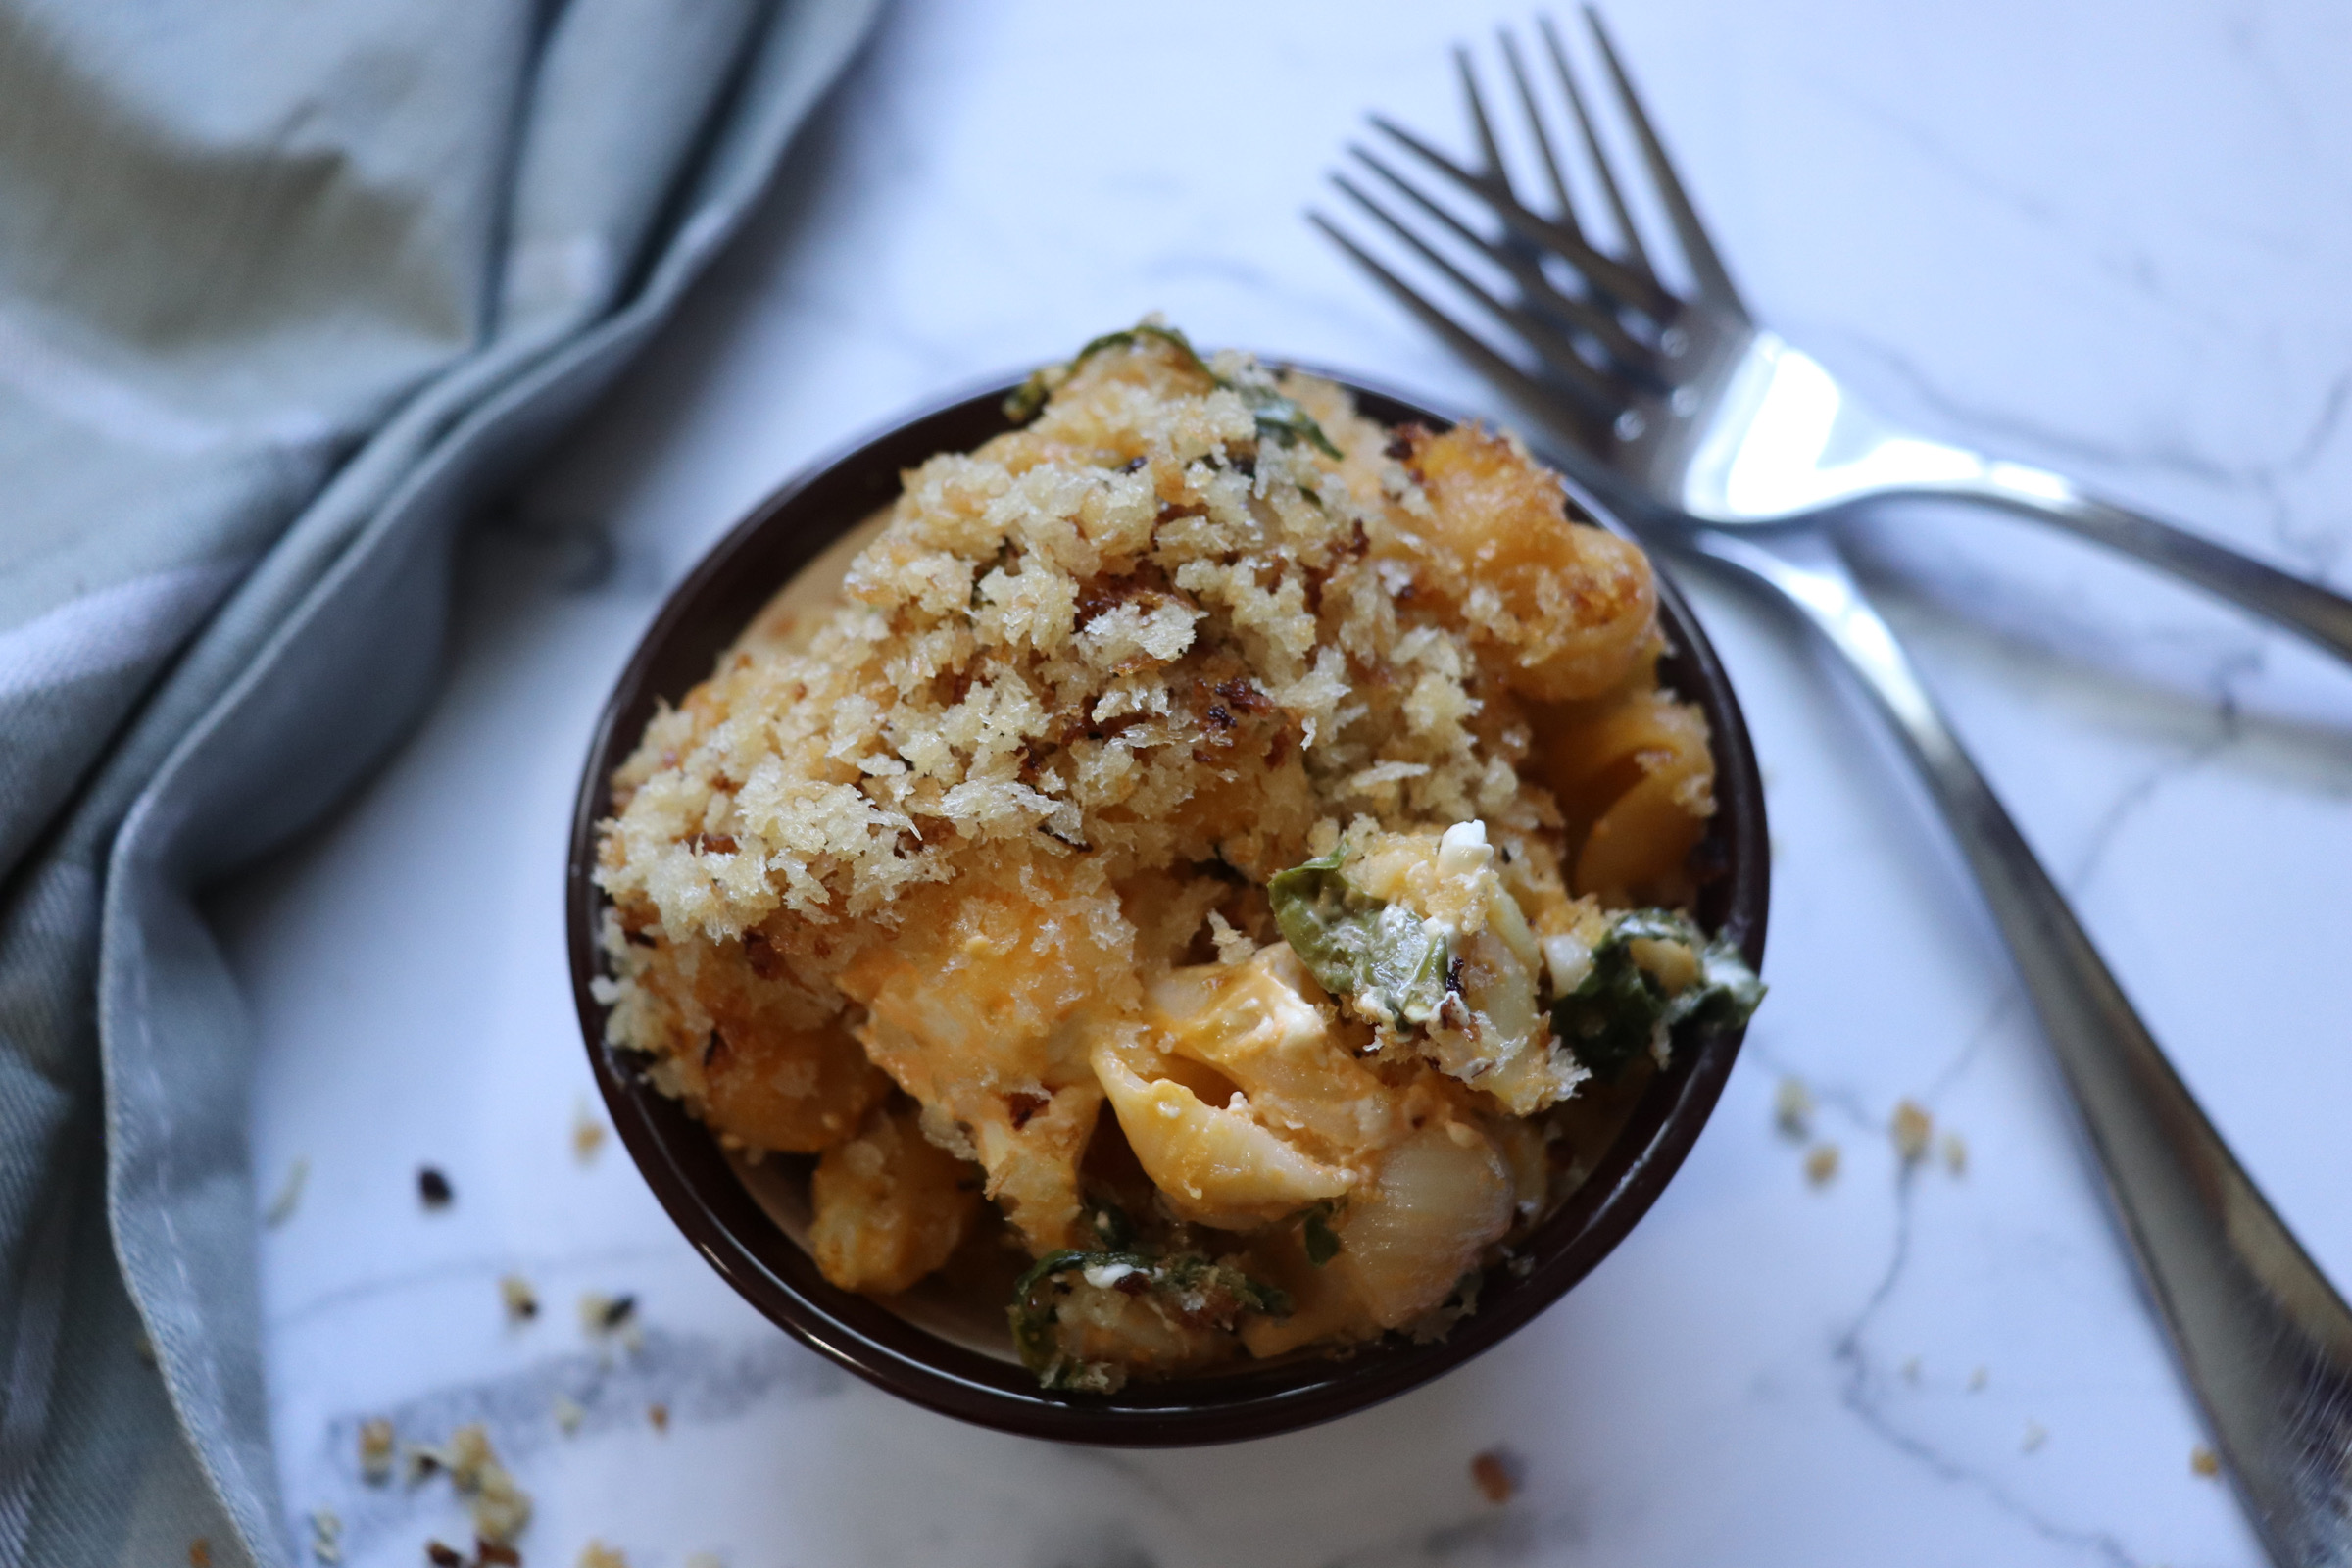
Gourmet Macaroni and Cheese
📖 Recipe
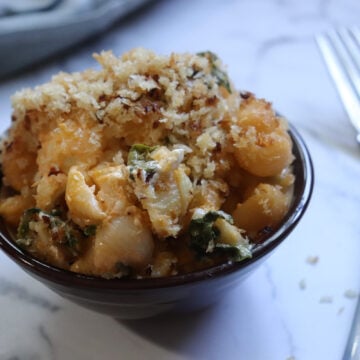
Easy Gourmet Mac and Cheese
Ingredients1x2x3x
- ▢ 1 box macaroni and cheese (Kraft, Velveeta, Annie’s, etc)
- ▢ 4 oz cream cheese (more or less)
- ▢ handful spinach, finely chopped
- ▢ 4 tablespoon panko breadcrumbs
- ▢ 2 tablespoon butter
- ▢ splash milk
- ▢ diced jalapeno (optional)
Instructions
BREAD CRUMBS
- Heat a small pan with butter on medium heat.
- Once the butter is melted add the Panko Bread Crumbs.
- Cook for about a minute until very lightly browned and remove from the heat.
MACARONI AND CHEESE
- Prepare the mac and cheese according to the boxed instructions
- Once done, keep the mac and cheese pot on low and add finely chopped spinach to it.
- Add chunks of cream cheese. TIP: cut it off of the block or spoon it out of a container. You want to have chunks and not blend into the sauce.
- Add jalapenos and a splash of milk.
- Mix gently so the cream cheese does not begin to melt in the warm pot. The spinach will begin to wilt at this point.
- Place mac and cheese in an oven safe pan.
- Pour the breadcrumbs over the macaroni and cheese and spread evenly across the top.
- Bake in a 350 degree oven for 3-5 minutes. The bread crumbs can brown quick, so it’s best to keep an eye on it.
- ENJOY! <3
Cranberry Sauce/Relish
📖 Recipe
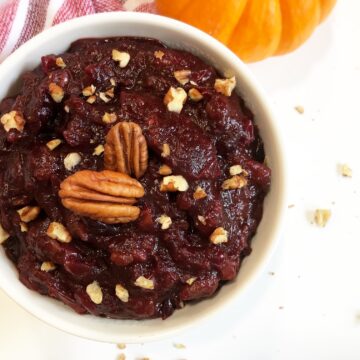
Cranberry Relish
Ingredients1x2x3x
- ▢ 8 oz fresh cranberries
- ▢ 1 ½ cup sugar (brown, white, or a mix)
- ▢ ½ cup chopped walnuts or pecans
- ▢ 1 orange, zest + juice
Instructions
- Place all of the ingredients in a pot and mix together.
- Turn on the heat to medium/low and let it simmer for about 15 minutes stirring frequently.
- After 15 minutes the cranberries should have cooked through and combined into a mixture with the other ingredients.
- Transfer into a refrigerator safe container and let it cool to room temperature. SIDE NOTE: You can enjoy the dish at room temperature or cooled.
- Refrigerate until ready to serve.
- Enjoy <3 Happy Eating, Folks!
Mashed Potatoes
📖 Recipe
No Holding Back, Thanksgiving Mashed Potatoes
Ingredients1x2x3x
- ▢ 4 cups boiled potatoes, pealed and cubed (use half russet and half red)
- ▢ 2 oz cream cheese or sour cream (optional)
- ▢ 1 tablespoon mayonnaise
- ▢ ¼ cup chicken broth (or equivalent bouillon for concentrated flavors)
- ▢ ¼ cup milk or heavy cream
- ▢ 2 tbsp salted butter
- ▢ salt
- ▢ pepper
Instructions
- In a large bowl, gather the contents starting with the HOT cube boiled potatoes. The potatoes must be hot when making this dish. I think it plays a big role in making fluffy potatoes.
- Add cream cheese and mayonnaise to the bowl. Do not mix yet
- In another small pot melt the butter (you can use the same one you boiled potatoes in to save time or microwave these contents).
- Add the milk/heavy cream and broth/bouillon to the pot and let it come to a boil.
- Pour the mixture into the bowl with the HOT potatoes.
- Now take a masher and mash the potatoes to combine it together ( you can also fluff perfect potatoes in a kitchen aid mixture!) Key tip: all ingredients should be same temperature.
- The mixture may be a bit runny but it will become fluffy and thicken as it cools within minutes of whipping/mashing.
- Add salt and pepper to taste.
- Serve hot.
Stuffing/Dressing
📖 Recipe
The Average Thanksgiving Stuffing Turned Fancy!
Ingredients1x2x3x
- ▢ 1 6oz package stove top stuffing
- ▢ 2 cups broth of choice
- ▢ 1.5 tablespoon butter
- ▢ 2 celery ribs, diced finely
- ▢ ½ onion, diced finely
- ▢ herbs for garnishment (sage, rosemary, thyme)
- ▢ shredded turkey (optional)
Instructions
- Heat oven to 350 degrees.
- In an oven safe pan, empty the dry stove top contents and mix in shredded turkey (if using).
- Heat a sauce pan on medium heat. Melt the butter and cook the onions and celery until slightly translucent (about 3-5 minutes).
- Mix the celery and onions with the stove top stuffing in the oven safe pan (toss it together for a quick mix)
- Pour the broth over the stove top stuffing. Lightly toss the ingredients.
- Cover tightly with foil and cook in the oven for about 10-15 minutes until heated through.
- Sprinkle some fresh chopped herbs on top and serve hot.
Krusteaz Gourmet Cornbread
📖 Recipe
Cornbread
Ingredients1x2x3x
- ▢ 1 package Krusteaz Honey Corn Bread
Instructions
- Make the cornbread according to the packaged instructions and enjoy as is!
- Want to spruce it up? Add a cup of cheddar cheese and jalapenos to the batter before baking.
- Make it pretty by topping it with a sprinkle of shredded cheese and fresh sliced jalapenos.
Easy Homemade Biscuits
📖 Recipe
Easy Bisquick Biscuits
Equipment
- ▢ Cookie Cutter (or anything round)
- ▢ Mixing Bowl
- ▢ Large Surface
- ▢ Cookie Sheet
Ingredients1x2x3x
- ▢ 4 cups Bisquick
- ▢ 1 cup sour cream
- ▢ 1 cup 7-up or Sprite
- ▢ ½ cup melted butter
- ▢ all purpose flour for dusting
Instructions
- Heat oven to 425 degrees.
- Mix together the bisquick flour, sour cream, 7-up or Sprite. Feel free to use a Kitchen Aid mixture since the dough might get a bit sticky.
- Continue to mix all of the contents together folding it over and kneading well.
- Flatten the dough out onto an all purpose flour dusted surface.
- Using a cookie cutter (or any round object) make round biscuits. The number will vary based on how big your cutter is.
- In a cookie sheet pan, pour the melted butter.
- Place each cut out biscuit on top of the butter.
- Cook for 12-15 minutes or until golden brown.
- Enjoy hot with butter and honey!
Turkey Gravy using the drippings
📖 Recipe
Thanksgiving Turkey Gravy
Equipment
- ▢ whisk
- ▢ Sauce Pot
Ingredients1x2x3x
- ▢ 4 cups turkey drippings or any packaged broth of your choice
- ▢ 2 tablespoon salted butter
- ▢ 2 tablespoon all purpose flour
- ▢ salt and pepper to taste
Instructions
- In a sauce pot, heat the butter until fully melted.
- Add the all purpose flour and whisk together until the flour is semi brown. (It will be a thick roux and you can add extra butter if you wish)
- Pour the broth into the pot and continue to whisk until heated through.
- Boil for about 2 minutes. The gravy will thicken as it cools.
- Serve warm.

Thanksgiving Candied Yams with Pecans
Equipment
- Oven safe pan
- Foil Paper
- bowl
- Butter Pot
- whisk
- spatula
- Cookie Cutter (optional)
Ingredients
- 4 cups sweet potatoes, that have been peeled, cube chopped, and boiled/steamed
- 3 tablespoon salted butter
- 2 cups marshmallows
- ¼ cup chopped pecans (+ extra for garnish)
- ¼ cup brown sugar
- ¼ cup heavy whipping cream (or milk)
- ⅛ teaspoon cinnamon powder (optional)
Instructions
- In a large bowl, add half of the sweet potatoes and mash them well.
- Add the other half of the sweet potatoes but do not mash them. Keep them cubed.
- Add the pecans and cinnamon powder to the bowl.
- In a small butter pot, brown 2 tablespoon of the butter. Add heavy whipping cream/milk and the sugar. Let it come to a simmer on low heat making sure to stir/whisk the whole time.
- Mix the butter pot contents with the sweet potatoes in the bowl.
- Put the sweet potatoe mixture in an oven safe pan and spread it out evenly with a spatula so the top has a flat surface.
- Brown the additional 1 tablespoon of butter and pour it over the sweet potato mixture. Try to be as even as possible. Feel free to use more butter if you need to (It’s Thanksgiving! Go big folks.)
- Layer the marshmallows on top of the candied yams. Get pretty with it! Use some extra pecans and write your family’s surname; use a cookie cutter and have a pattern/leaf in the middle; alter lines of pecans and marshmallows… or be simple and just use marshmallows on top.
- Tightly cover the oven safe pan with foil paper. Leave air in the middle so the foil does not touch the marshmallows at all.
- Bake for 10 minutes at 350.
- Uncover the foil and bake again for 3-5 minutes.
- If you prefer to brown your marshmallows even more, broil them on low heat for 1-2 minutes (keep an eye on them though).
- Serve HOT!
Recipe Courtesy of The Curry Mommy

The Common Thanksgiving Green Bean Casserole
Equipment
- bowl
- spatula
- Oven safe pan
- Foil Paper
Ingredients
Casserole
- 4 cups green beans, chopped and steamed (slice lengthwise in half, and then 1 inch pieces… trust me)
- 1 can Campbell’s cream of mushroom soup (10oz)
- 4 oz French’s fried onions
- ⅛ teaspoon fresh coarse black pepper (more or less)
- 1 cup milk or heavy cream
Topping
- 4 oz French’s fried onions
Instructions
- In a large bowl, mix everything together for the casserole (save time and mix it in the oven safe pan you will be cooking in)
- Place the mixture in an oven safe pan and cover tightly with foil.
- Bake at 350 degrees for 15 minutes (if your green beans are cold, add 5 minutes to the timer).
- Uncover the foil and layer the French’s Fried Onions on top.
- Bake for an additional 10 minutes.
- Serve hot!
Recipe Courtesy of The Curry Mommy
Easy Gourmet Mac and Cheese
Ingredients
- 1 box macaroni and cheese (Kraft, Velveeta, Annie’s, etc)
- 4 oz cream cheese (more or less)
- handful spinach, finely chopped
- 4 tablespoon panko breadcrumbs
- 2 tablespoon butter
- splash milk
- diced jalapeno (optional)
Instructions
BREAD CRUMBS
- Heat a small pan with butter on medium heat.
- Once the butter is melted add the Panko Bread Crumbs.
- Cook for about a minute until very lightly browned and remove from the heat.
MACARONI AND CHEESE
- Prepare the mac and cheese according to the boxed instructions
- Once done, keep the mac and cheese pot on low and add finely chopped spinach to it.
- Add chunks of cream cheese. TIP: cut it off of the block or spoon it out of a container. You want to have chunks and not blend into the sauce.
- Add jalapenos and a splash of milk.
- Mix gently so the cream cheese does not begin to melt in the warm pot. The spinach will begin to wilt at this point.
- Place mac and cheese in an oven safe pan.
- Pour the breadcrumbs over the macaroni and cheese and spread evenly across the top.
- Bake in a 350 degree oven for 3-5 minutes. The bread crumbs can brown quick, so it’s best to keep an eye on it.
- ENJOY! <3
Recipe Courtesy of The Curry Mommy

Cranberry Relish
Ingredients
- 8 oz fresh cranberries
- 1 ½ cup sugar (brown, white, or a mix)
- ½ cup chopped walnuts or pecans
- 1 orange, zest + juice
Instructions
- Place all of the ingredients in a pot and mix together.
- Turn on the heat to medium/low and let it simmer for about 15 minutes stirring frequently.
- After 15 minutes the cranberries should have cooked through and combined into a mixture with the other ingredients.
- Transfer into a refrigerator safe container and let it cool to room temperature. SIDE NOTE: You can enjoy the dish at room temperature or cooled.
- Refrigerate until ready to serve.
- Enjoy <3 Happy Eating, Folks!
Recipe Courtesy of The Curry Mommy

No Holding Back, Thanksgiving Mashed Potatoes
Ingredients
- 4 cups boiled potatoes, pealed and cubed (use half russet and half red)
- 2 oz cream cheese or sour cream (optional)
- 1 tablespoon mayonnaise
- ¼ cup chicken broth (or equivalent bouillon for concentrated flavors)
- ¼ cup milk or heavy cream
- 2 tbsp salted butter
- salt
- pepper
Instructions
- In a large bowl, gather the contents starting with the HOT cube boiled potatoes. The potatoes must be hot when making this dish. I think it plays a big role in making fluffy potatoes.
- Add cream cheese and mayonnaise to the bowl. Do not mix yet
- In another small pot melt the butter (you can use the same one you boiled potatoes in to save time or microwave these contents).
- Add the milk/heavy cream and broth/bouillon to the pot and let it come to a boil.
- Pour the mixture into the bowl with the HOT potatoes.
- Now take a masher and mash the potatoes to combine it together ( you can also fluff perfect potatoes in a kitchen aid mixture!) Key tip: all ingredients should be same temperature.
- The mixture may be a bit runny but it will become fluffy and thicken as it cools within minutes of whipping/mashing.
- Add salt and pepper to taste.
- Serve hot.
Recipe Courtesy of The Curry Mommy
The Average Thanksgiving Stuffing Turned Fancy!
Ingredients
- 1 6oz package stove top stuffing
- 2 cups broth of choice
- 1.5 tablespoon butter
- 2 celery ribs, diced finely
- ½ onion, diced finely
- herbs for garnishment (sage, rosemary, thyme)
- shredded turkey (optional)
Instructions
- Heat oven to 350 degrees.
- In an oven safe pan, empty the dry stove top contents and mix in shredded turkey (if using).
- Heat a sauce pan on medium heat. Melt the butter and cook the onions and celery until slightly translucent (about 3-5 minutes).
- Mix the celery and onions with the stove top stuffing in the oven safe pan (toss it together for a quick mix)
- Pour the broth over the stove top stuffing. Lightly toss the ingredients.
- Cover tightly with foil and cook in the oven for about 10-15 minutes until heated through.
- Sprinkle some fresh chopped herbs on top and serve hot.
Recipe Courtesy of The Curry Mommy
Cornbread
Ingredients
- 1 package Krusteaz Honey Corn Bread
Instructions
- Make the cornbread according to the packaged instructions and enjoy as is!
- Want to spruce it up? Add a cup of cheddar cheese and jalapenos to the batter before baking.
- Make it pretty by topping it with a sprinkle of shredded cheese and fresh sliced jalapenos.
Recipe Courtesy of The Curry Mommy
Easy Bisquick Biscuits
Equipment
- Cookie Cutter (or anything round)
- Mixing Bowl
- Large Surface
- Cookie Sheet
Ingredients
- 4 cups Bisquick
- 1 cup sour cream
- 1 cup 7-up or Sprite
- ½ cup melted butter
- all purpose flour for dusting
Instructions
- Heat oven to 425 degrees.
- Mix together the bisquick flour, sour cream, 7-up or Sprite. Feel free to use a Kitchen Aid mixture since the dough might get a bit sticky.
- Continue to mix all of the contents together folding it over and kneading well.
- Flatten the dough out onto an all purpose flour dusted surface.
- Using a cookie cutter (or any round object) make round biscuits. The number will vary based on how big your cutter is.
- In a cookie sheet pan, pour the melted butter.
- Place each cut out biscuit on top of the butter.
- Cook for 12-15 minutes or until golden brown.
- Enjoy hot with butter and honey!
Recipe Courtesy of The Curry Mommy
Thanksgiving Turkey Gravy
Equipment
- whisk
- Sauce Pot
Ingredients
- 4 cups turkey drippings or any packaged broth of your choice
- 2 tablespoon salted butter
- 2 tablespoon all purpose flour
- salt and pepper to taste
Instructions
- In a sauce pot, heat the butter until fully melted.
- Add the all purpose flour and whisk together until the flour is semi brown. (It will be a thick roux and you can add extra butter if you wish)
- Pour the broth into the pot and continue to whisk until heated through.
- Boil for about 2 minutes. The gravy will thicken as it cools.
- Serve warm.
Recipe Courtesy of The Curry Mommy
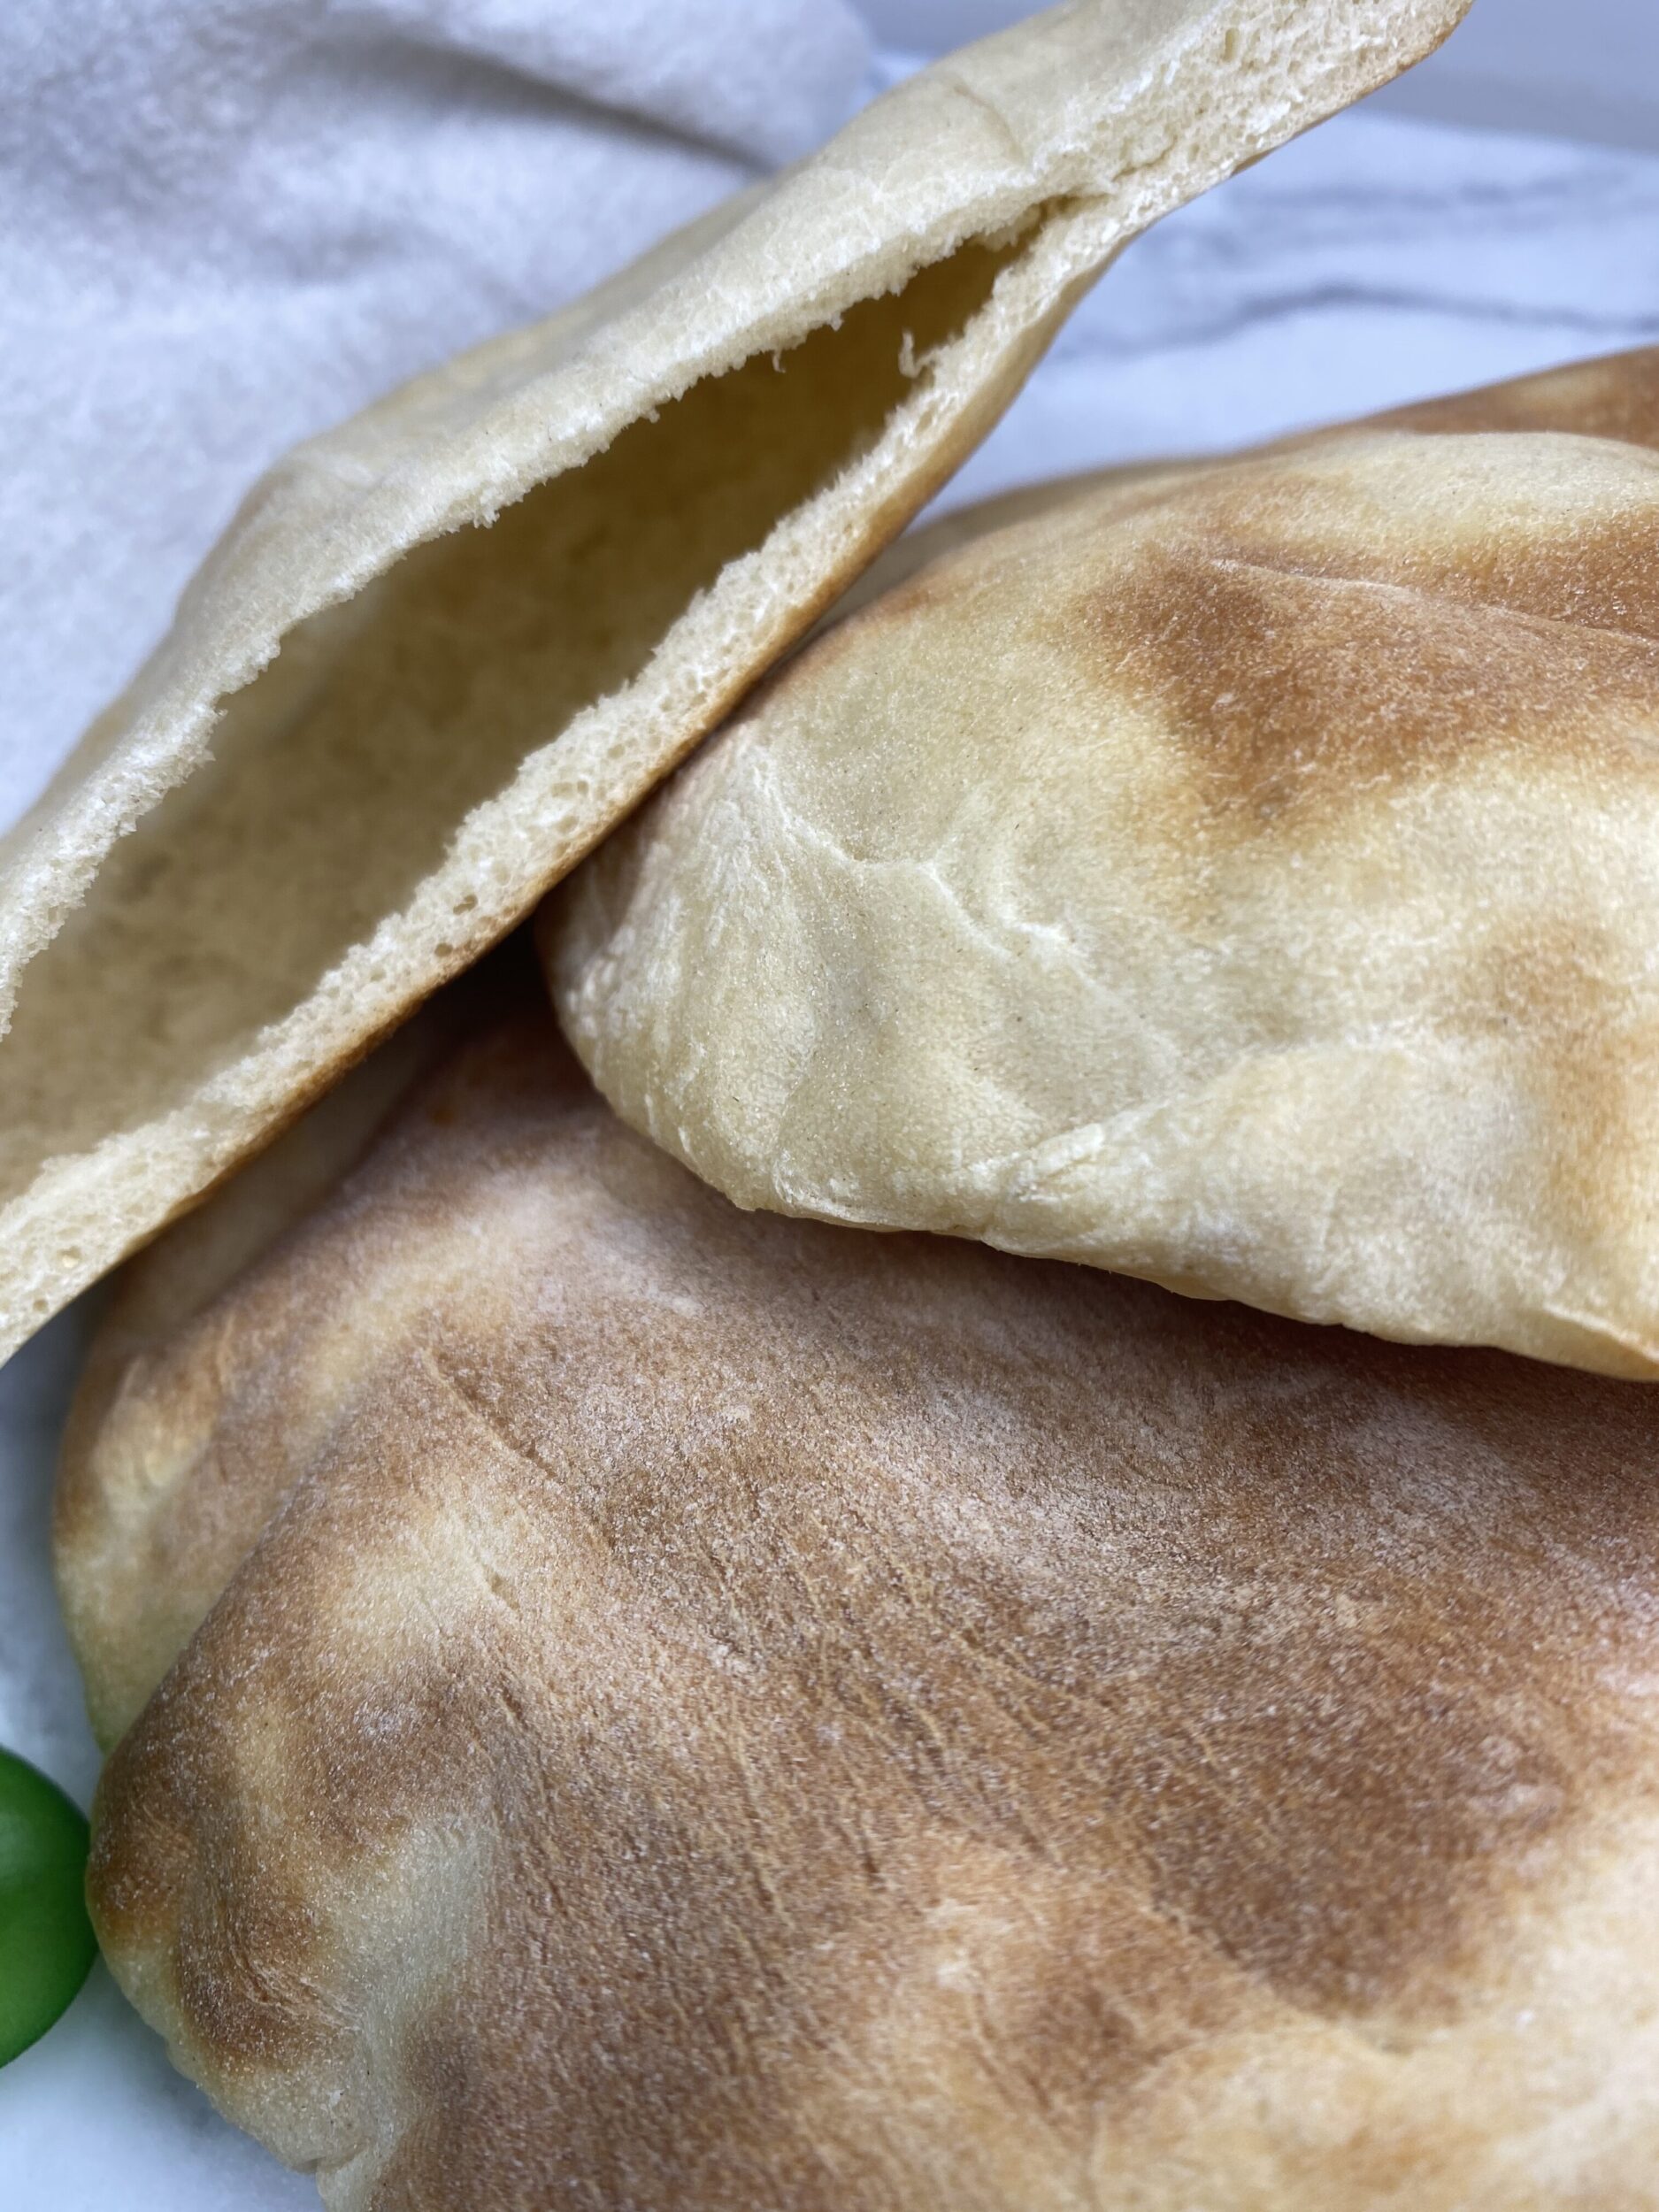
An Oven Baked Greek Pita Pocket Bread recipe that is tasty and easy to make .
Mediterranean Bread on Repeat
This delicious Greek pita pocket bread recipe can be made in the comfort of your own home with pantry essential ingredients such as all purpose flour or whole wheat flour. The comforting Greek bread can be used to make tasty gyros or falafel sandwiches and it pairs well with an extra virgin olive oil dip , hummus, tzatziki sauce, or my garlic labneh recipe .
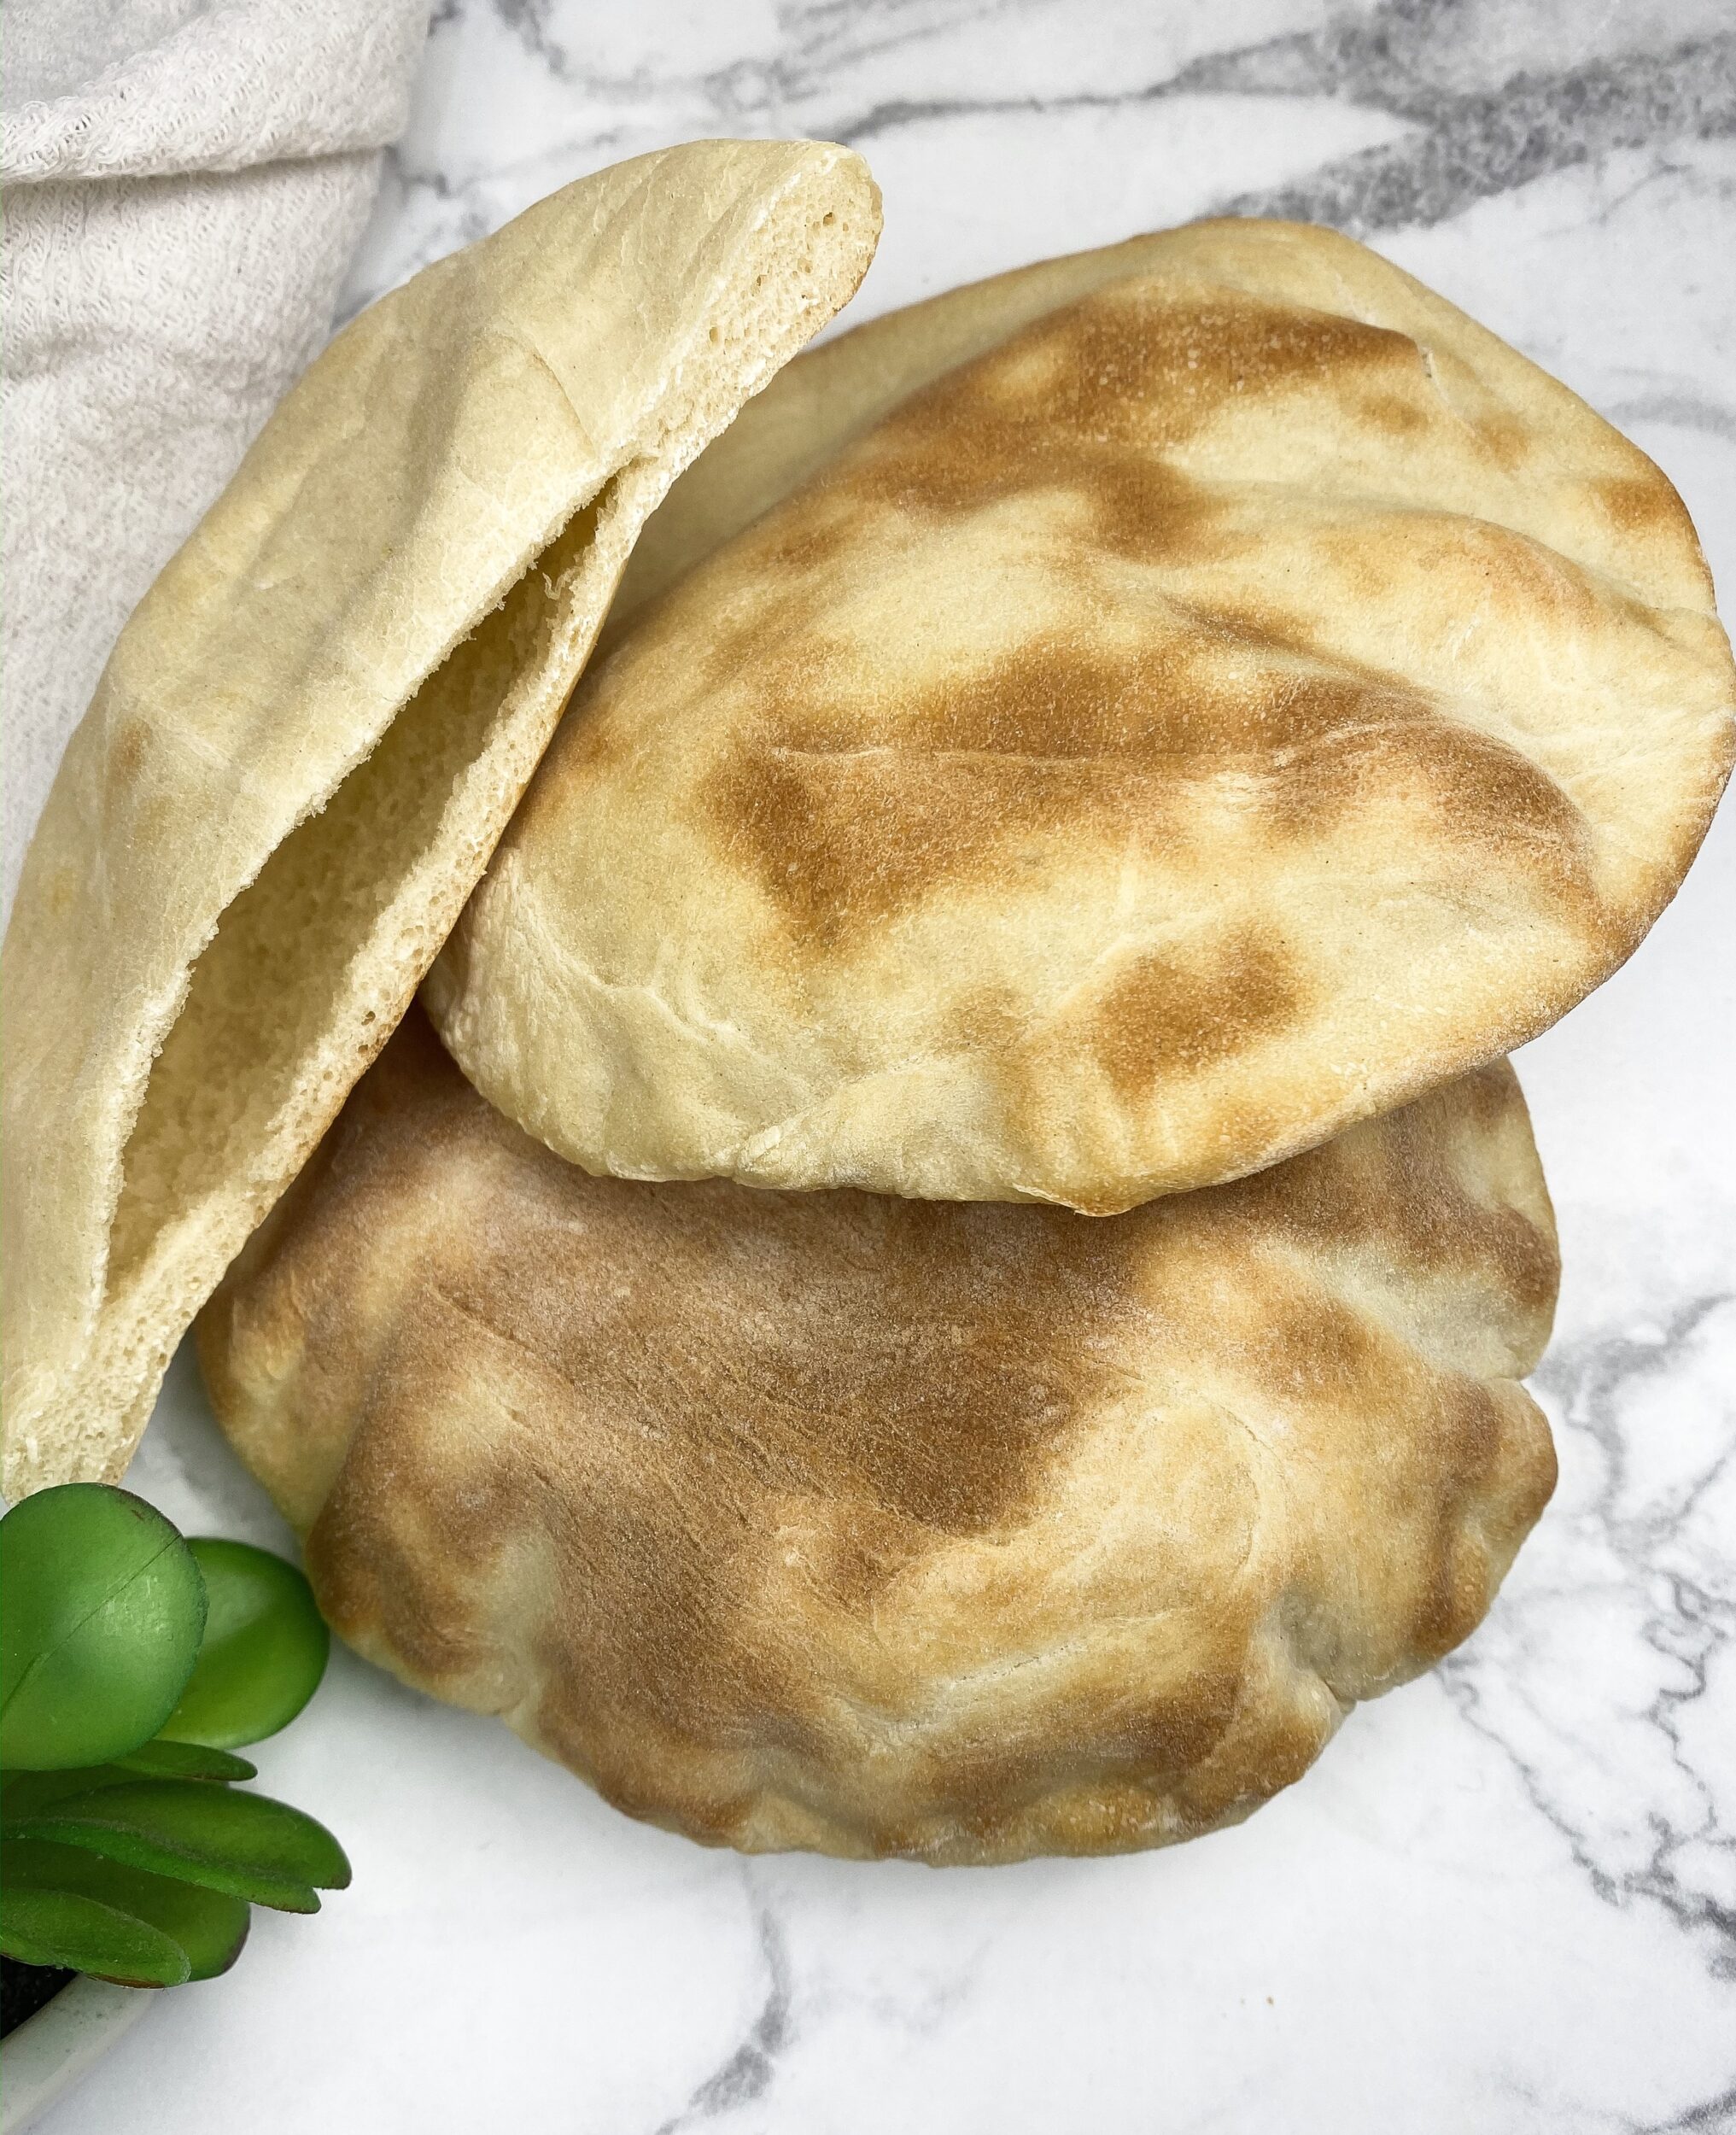
When you venture off into making a recipe that you have never made before things can be a bit overwhelming. I understand. But trust me, when I say this Greek Recipe is fail proof thanks to one of my friends! She has all the tips and tricks, I tell you. Pita bread can turn out to be chewy or flat sometimes, which only discourages us from trying again. Am I right or am I right? If that has been your experience, then I urge you to try it one more time with this detailed recipe.
I LOVE BREAD!
What kind of flour is needed for Greek Pita Bread?
I prefer to use all purpose flour for this recipe. Nothing fancy, just regular American All Purpose Flour is perfect. In our home, we purchase organic variations of all purpose flour. In most cases, I buy it from Costco in bulk because I love to bake breads.
Can I make Gluten Free Greek Pita Pocket Bread?
I have never tried to make it before, but my friend swears by gluten free flour by Bob’s Red Mill. If you do try it as a replacement in this recipe, I would love to hear how it came out.
Whole Wheat Greek Pita Bread Recipe
You can make this recipe using whole wheat flour as a substitution for all purpose flour and they turn out just as great!. Growing up, whole wheat was used more than all purpose flour. In fact, my parents rarely ever bought white bread, flour tortillas, etc. For that reason, I have always used whole wheat flour to make Greek Pita Bread. I must say though, all purpose flour tastes a lot better and the end result of the pita is a lot more sturdy to hold the ingredients inside.
Is Greek Pita Vegan?
YES! This recipe is 100% vegan without any substitutions. Hence, it’s naturally this way!
Does Greek Pita Bread have dairy?
My recipe listed here has no dairy. It is a vegan Greek Pita Bread that tastes phenomenal as is.
What to eat with Greek Pita Bread?
I love it as is, no joke. It tastes great with an extra virgin olive oil dip such as this one , hummus, or my Garlic Labneh Recipe (to die for). My kids eat stuffed pita pockets with veggies, mayo, mustard, and their choice of deli meat that I purchase or make (chicken). My husband likes eating these pita pockets with gyro meat from Trader Joes or homemade falafel fritters.
Can I make Pita Bread ahead of time?
You bet! Make a stack of these and refrigerate them for days at a time. Simply reheat in a microwave or a covered pan in the oven. Yes, you read that right “covered pan”. Dry heat can make the pita bread chewy. The trapped heat will help keep them moist and soft especially when heating multiple breads at once. You can also roast them over an open flame on the stove top to eat immediately.
How long can I store them?
I don’t recommend anything over 1 week, because they are so easy to make you can make a fresh batch in a matter of a few of hours total. Be sure to store than in the refrigerator.
Can I add spices to the dough?
Yes! My husband loves them with cumin seeds. I personally like them plain as can be which gives me more room to make spicy and flavorful dips to pair it with.
Where can I buy Greek Pita Bread?
This was once a million dollar question. Whole Foods almost always has them in stock. I remember as a kid we could never find Pita Pocket Bread in Little Rock, but it was more so because we never went to health food type grocery stores such as Whole Foods. My parents love falafels, so we learned how to make them at home or bulk buy whenever they were available.
Detailed Greek Pita Pocket Bread Recipe
Don’t let the long list of instructions in the recipe discourage you. I tried to be as detailed as possible so there are no errors along the way. I truly hope you enjoy the recipe!
Love this recipe? Please leave a 5-star 🌟🌟🌟🌟🌟rating in the recipe card below & consider leaving a comment as well. I would greatly appreciate it!
Next, consider a follow on social media @ Instagram , Pinterest , YouTube , and F acebook . Don’t forget to tag me when you try one of my recipes!
📖 Recipe

Greek Pita Pocket
Ingredients1x2x3x
- ▢ 2.5 cups all purpose flour + some for dusting
- ▢ 1 cup warm water
- ▢ 2 teaspoon dry yeast
- ▢ 1 tsp sugar
- ▢ 1 tablespoon extra virgin olive oil + extra for coating
- ▢ 1.5 tsp salt
Instructions
- Combine warm water, yeast, and sugar in a large bowl. Stir gently with a silicone or wooden spatula and set it aside for about 5 minutes so the yeast activates.
- Add ½ cup of all purpose flour to the mixture. Mix it gently with a silicone or wooden spatula and set it aside for 15 minutes. No need to cover it.
- Slowly, add the remaining all purpose flour, salt, and oil to the large bowl. Mix it well with a silicone or wooden spatula until the contents form one large ball that you can manage to knead.
- Dust a deep bowl/pan with a generous amount of all purpose flour and set it aside.
- Dust a large surface area with all purpose flour.
- Take the dough and continue to knead by hand on the dusted surface for about 5-7 minutes until a smooth elastic ball has formed. Trust me, this is fun!
- Coat the dough with a generous amount of extra virgin olive oil and then place it inside the dusted bowl/pan.
- Dust the top of the dough with all purpose flour and then wrap the bowl/pan with plastic wrap or cover with a damp kitchen towel assuring it does not touch the dough. You want to leave space for the dough to rise.
- Place the bowl/pan in a warm spot for 1 hour (microwave works well for me). The dough will double in size.
- Dust a surface area with all purpose flour again. Place the double in size dough on the surface, form a log without kneading too much, and divide it into 8 pieces.
- Take each piece and roll it in your hands to form a smooth ball once again. Isn’t the elastic dough fun to play with?
- Place each hand kneaded dough ball back into the bowl assuring they don’t touch each other (no additional dusting is required).
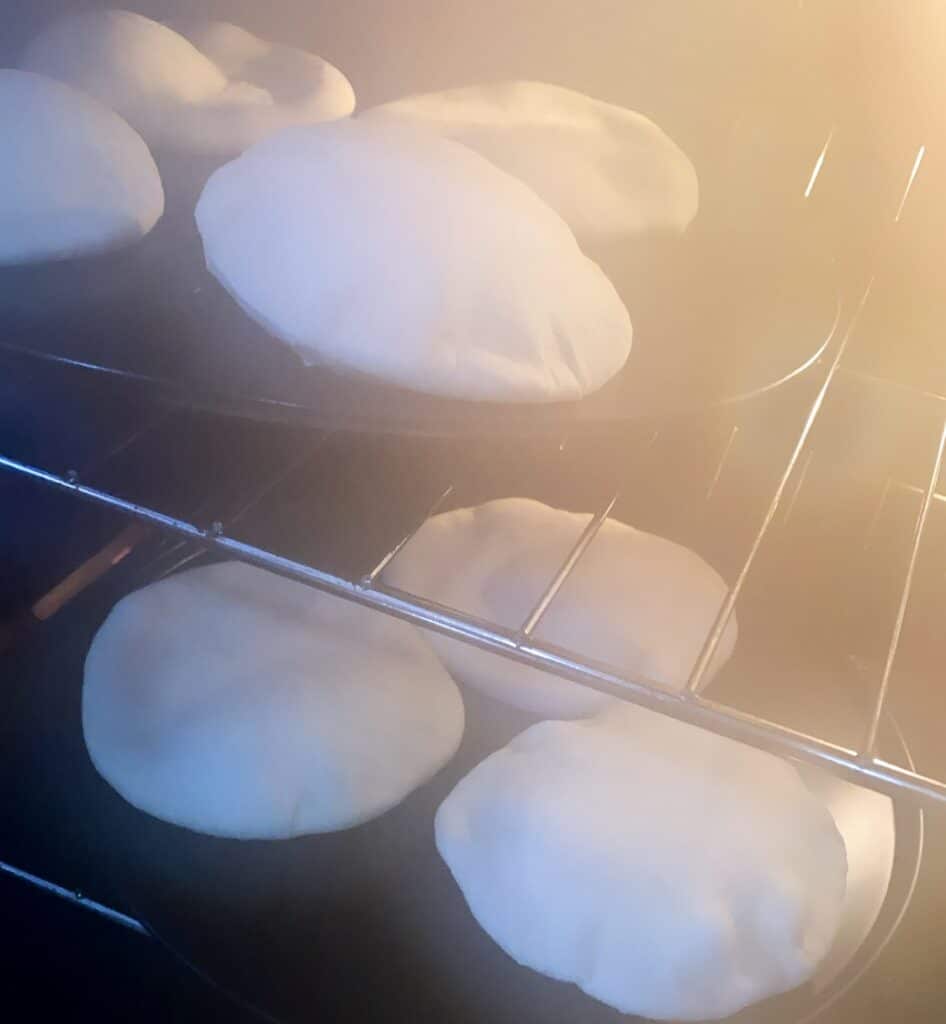
- Heat an oven to 500 degrees.
- Cover it tightly again with plastic wrap or a damp cloth and let it rest again for about 15 minutes in the same warm spot as before.
- Using a large surface area (I like to use a cold surface like granite or marble) roll out the pita pocket one at a time to about 8-9" in diameter. Use flour for dusting if the dough begins to stick to the surface.
- Place the pita pockets on a non-stick baking pan assuring they are not touching each other. Note-get these Pita Pockets in the oven ASAP after rolling them out.
- Put the pan in the oven and cook for about 7 minutes. Check on them via the oven light because the excitement to see them puff up is real. The oven light will eliminate how often you open the oven door. High temperature cooking is key here.
- Pull the pans out of the oven once the Pita Pockets have browned to your liking and wrap them with a dry kitchen towel until they cool down. This will help soften them.
- Store in an air tight container in the refrigerator for up to 1 week.
- REHEATING INSTRUCTIONS- in a microwave for 5-10 seconds or over an open gas flame right before eating.
- Stuff with your favorite ingredients, dunk in your favorite dips, or split in half and top with your favorite ingredients. Either way, enjoy 🙂
